Showing posts with label Caffenol. Show all posts

Friday, March 31, 2017

More studiousness


This time trying out the 60mm Cheerios box 120 Populist that was portrayed in the pinhole test photos. I can report that three coats of matte black spray paint is plenty sufficient to make this camera opaque

As you can tell from my profile picture, I'm enough of a nerd (and fan of holidays in general) to feel compelled to bake a pie on Pi Day. In recognition of Isaac Newton's significant work with Pi (although they didn't call it that back then) I chose to make it out of apples. To get as pinholey as possible I piled them into an arrangement, and removed them one at at time as I peeled them, closing the shutter when there was only one left.


This image of the pile of peels looks for all the world to me as though it was done with a large aperture. As this exposure was going on, I was mixing the apples and preparing the pie plate nearby and maybe I bumped the table and the edges of the pile shook more than the center.


I descended into the underworld of Polk Library through this door every day for thirty years. I wonder if I would have remained more sane if I'd worked somewhere with a window. It used to drive me crazy to sit on building planning committees and listen to them insist that it was cruel to make faculty work in an office without windows. The image has got another mysterious impression of limited depth of field. The foreground consists of the eight stairs which at this angle and with their similar concrete grey look more like a gradient of focus.


I started the roll just after I finished the one from my previous batch of studies, turning to the left to the bench where the disk golfers wait for the rest of their foursome to finish. There was about a twenty mile-per-hour sustained wind. Not sure why I got away with the last exposure in the other camera, but the first image on this roll was ruined as I could see the camera vibrate in the wind during the exposure. I used my body as a windbreak for this one and that seems to have worked. Another illusion of large aperture – the muddy foreground and the bench were not affected by the gale but the prairie grass and the trees certainly were. The image is confirmed as pinhole by the clouds which were so distant they didn't move enough during the sunny day exposure to significantly blur and remain sharp.


This building in downtown Oshkosh, designed to give the impression of an old German castle, is known as Pabst Square because it was built to bottle beer in Oshkosh. The beer was brewed in Milwaukee, but refrigeration wasn't sophisticated enough at the time to transport and store bottled beer. They could ship the kegs successfully and bottle just enough to be sold before the beer spoiled. Until the late 1990's, the street in front of it was a railroad track.


I'm not sure what this little building was in the former industrial area next to the river. One of the tricks of the successful photography student is to be inspired by the greats, and this one reminded me of Walker Evans.


We're probably beyond the season of ice and snow, but in Wisconsin you can never tell, so the shovels still stand at attention next to the back door.


The disappearance of the snow has revealed our somewhat cavalier cleaning of the garden last fall.


Arista.edu 100 is slow to start with and has terrible reciprocity characteristics so this interior was about a two hour exposure. If you can stay out of the room, you can photograph what otherwise would be a pretty wiggly subject. Can't quite put my finger on why, but this one reminds me of Clarence White.


All with Artista.edu 100 developed in Caffenol with a .32mm pinhole 6cm from a 6x6cm frame.

Tuesday, March 21, 2017

Studies in black and white.

One result of all this camera making lately is I feel the need to run film through them and actually try to experience what it's like to use them.  This is how I learned about using two layers for the shutter to make it stiffer, and not to trust the template print and card stock to be totally opaque.

But, I've always been the kind of person that can't just fire off a roll of film without wanting to get the best pictures I could, and I'm also a little impatient to see the results, so I find myself in the not unpleasant situation of approaching the task as a student of basic black and white photography again. And I'm not unpleased with the results.

You never know what you're going to find at the farmers market.  I've been finding myself calling to vegetables a lot lately, and it looks like they're responding. Obviously one way to study something is to emulate the classic genres. According to his Daybooks (which come to think of it I emulate a little in this blog), before he took the famous funnel photograph, Weston held on to that pepper and kept photographing it for a week until it almost withered. I still haven't had the nerve to cook these two entwined carrots, but the other two have already been in the other kind of soup.  


Here are the cameras I've been talking about. Obviously the camera that took this picture is not in the image. It's a little different and there will be another post about that camera eventually

The one on the left is The 10-year-old Populist.

The 60mm black one on the bottom right is what I used to take the snowy day pictures and the test with 6 different pinholes - note how the black top layer of the paper on the front has torn away by taping all those pinholes to it.  It's also got the single-thickness middle layer shutter which is too easily bendable. The one on the left on the bottom is a 45mm which I discovered needed more light-proofing when I tested it with a strip of paper.  The 60mm one on the top, made out of the same Cheerios box card stock, I just finished a roll in, and the three coats of paint seem sufficiently opaque, but I haven't scanned the negatives yet. 


One thing interesting about photography mentioned by Henry Talbot in The Pencil of Nature is how the same Bust of Patroclus can look different when illuminated with different angles and qualities of light.  Here's the corner of the sun room in the afternoon.


And just after dawn in the morning.


Looking for a new angle is sometimes all you need. I've done a million pictures of the dining room from the kitchen door and from the living room, but I don't think I've ever put the camera on top the piano.  This was just before sunset.


Taking advantage of the weather is a strategy. We had one extremely foggy day, but it was also misting pretty heavily.  Not the weather you want to expose a paper camera to but there are ways around that.  Our magnolia after it was ratted on by a neighbor for blocking their view from backing out the driveway (funny it never blocked my view) and was forcibly pruned by the city.


A classic genre for me is the sun coming in the south kitchen window.


The 7th hole on the yellow disk golf course at the Winnebago County Park. The sun is only maybe 15 degrees above the top and shining straight onto the camera with no flare. This is the first pinhole I've ever tarnished with Liver of Sulfur. I only had a little lump, but I've bought more and look forward to experimenting with it.


All with Arista.edu 100 developed in Caffenol with a .28mm pinhole 45mm from a 6x6cm frame.

Thursday, February 9, 2017

A snowy day

It's been a gloomy January.  Very few sunbeams to work with and the only thing I could find around the house that inspired me were these roses Sarah had drying in a bowl on the counter.


One day it snowed when the temperature was right at freezing so it stuck to all the trees, and that looked interesting.


Down the garden path.


The watering can where it was left at the end of the growing season.


And one of the giant oaks at the end of the soccer field at Merril School.


Arista.edu 100 developed in Caffenol C-M, .32mm pinhole 60mm from 6x6 cm frame.

Monday, February 6, 2017

So just how much difference does it make?

There was a lot of interest in my comparison of brass and aluminum pinholes last week, with lots of comments on Facebook expressing definite opinions of one sort or another, and one especially got to me where a rookie pinholer wondered how to avoid "blurriness."  There were several responses that seemed to imply that the only way was to buy a commercial pinhole.

So I felt it was probably the responsible thing to do to actually take pictures with a variety of pinholes to see exactly how much and what kind of difference it does make.

My original plan was to make the best pinhole in the same size out of several materials, but I quickly found out that's pretty difficult to do with hand-drilled pinholes, and some materials are harder to work with than others.  Again, I used my standard technique of drilling through with a number 10 sewing needle, in this case held in a cork from a bottle of Scotch, against a hard table with a matchbook cover underneath the material so the needle could just penetrate enough to make the size hole I wanted, in this case .3mm, and then sanding the burr off the opposite side, and in one case, sanding the drilled-into side to make it smoother. I thought about getting a micro-drill at this size, but that would have been a mail order purchase and I could envision breaking something that small the first time I touched it. (Curious how you work with those - something like a tiny hand drill?)

So here are the six pinholes, this time rendered at the same scale. They range from about .29 to about .33mm.  I mounted them on the outside of the shutter of a 60mm 6x6 camera so I could change the pinhole between each exposure.  (Mr. Pinhole says .32 is optimum at this distance) 


They are from left to right:

1. Sheet brass .05 mm thick from a roll I bought in 1992 that has had thousands of pinholes made from it. It's pretty close to round but not quite.  It's hard to spin the Scotch cork around - maybe I should use a pencil or an exacto handle I could twirl more easily instead. 

2. Very thin brass foil.  I only had about two square inches of this stuff.  I kept making slightly oval pinholes and it was difficult to get a really perfect edge.  If I tried to smooth out the edge, I'd end up enlarging it, so this was the best one I could do.

3. A piece of beverage can aluminum (a beer can, Justin). This is the initial state which one commenter described as "craters of the moon."

4. The beverage can aluminum with the drilled-into side sanded to remove the crater rim. I was using 400 grit sandpaper, so maybe I could do better with a finer grit, but I checked at the hardware store and decided not to put $6.00 into it just for this project.

5.  One commenter mentioned that "cooking" aluminum was a fine material.  In retrospect, I supposed they meant a disposable pie pan or something like that, but I used regular aluminum foil. I tried several times to sand the burr off the back side but kept tearing it, so when I got this relatively circular one about the right size, I quit while I was ahead. From it's appearance it should be a really awful pinhole.

6. A Gilder Electron Microscope Aperture, which is in copper that's probably about .025mm. Maybe not a premium priced laser drilled pinhole, but the best I could do, and I can't image how those expensive pinholes can be rounder or smoother.

So here are the pictures. They are all half hour exposures about three feet under a couple flourescent fixtures, using Arista.edu 100 developed in Caffenol C-M.  They vary a little in density and it's impossible to get the scanner software not to do a little preprocessing, but I tried to make them as unmanipulated as possible.

1. The .05mm thick sheet brass.


2. The brass foil.


3. The Aluminum with the crater rim.


4. Aluminum with the crater rim sanded off.


5. The Aluminum foil. Notice that the bottom of the frame is slightly lower contrast than the top, something I didn't expect from diffraction at this scale.


6. The Gilder electron microscope aperture.


There's a little difference in contrast, but that may have to do with variation in exposure based on the slight variations in size.  Except for that diffraction caused fogging at the bottom of No. 5, it's a little hard to tell them apart when looking at them at this scale.

But the argument about this sort of thing was about sharpness, so let's look at some details. These are actual pixel reproductions. I scanned them at 2400 dpi, so assuming you're looking at them at "actual size" in your browser and based on the native screen resolution of my MacBook Air of 128dpi, that means these are like looking at a 42 inch print!

This is the text below that high speed camera shot on the upper left hand page of the encyclopedia (The bold text in the first line actually says "High speed camera."  Because of the variations in density, I adjusted the levels on this detail to where I thought you got the best look at the text.


The diagram of the pinhole camera on the right hand page of the encyclopeda.


The Cheerios shutter on the camera to the right.


The shutter speed dial on the Canon F-1.  In this one you can clearly see the reduced contrast in No.5.


And lastly, the 529 Graphite designation on the shutter of the Chaneloflex.


I guess there's a few conclusions that can be drawn.  

First it's a pretty robust process.  Even the ragged, three dimensional hole in the aluminum foil created a reasonable image, and with a little care you can easily drill a pinhole that most people won't be able to tell the difference from an expensive laser drilled aperture.

To that rookie pinholer that everyone wanted to buy a premium pinhole, I think your problem was a pinhole that was too big.

One thing that I sort of knew already from some experiments I did a long time ago is that diffraction is going to reduce contrast as much as it's going to reduce sharpness.

A surprise was that the aluminum pinhole with the crater rim looks like it performed a hair better than the one where I sanded it off. Go figure.

And of course, the Gilder aperture wins in sharpness, if you're into that sort of thing, and I bet if I repeated the experiment with a .15 aperture on 35mm film it would make more difference. 

But there are other considerations. Drilling your own pinhole is just more pinholey than buying one. That's kind of a snotty attitude, but it's about as close to religion as I get. And of course concept, subject matter, lighting, creative use of motion and composition can elevate an image more than simple sharpness.


Friday, January 13, 2017

New 6x6 at 45 and better results with caffenol

June 2019. When my university retiree account disappeared with a new change in policy, the pictures I uploaded to this blog while logged into that account disappeared. I'm working on fixing that but it's going to be at least a summer long project. The pictures I took with the camera are restored below.

Although I built the Evil Cube specifically for photographing the mansion at the Paine Art Center, when I went over there I also took the Glenlivet Vertical Populist.  I discovered I probably had more opportunities with the wider angle and if I had a second 45mm camera, I could take better advantage of the time I was there.


So I took the template I made for the 120 Populist, cut 3 cm out of the middle to make it 6x6 cm and cut the flaps and the film bay spacers down to 45mm and put the film counter hole in the middle.  Otherwise, follow the recipe.  There are some modern improvements such as three layer shutters and using cut off nails to keep the film reels parallel. The Student Services from the University were giving away those rubber wristbands (how can anybody stand to have those on their wrist?) in the school colors, black and gold. They turn out to be just the right size for the 120 populist and wide enough that you can cut them in half so placed on both sides, they hold the winders on very securely, and turned with the lettering inside, give that professional black body look. I hand drilled the pinhole which is .27mm.

I had been experimenting with caffenol developer last year using my old Compact 120 6x9, and had significant issues with background fogging - I thought.  I got some improvement working with table salt as a restrainer, but the pattern of the fogging increasing toward the edges of the film made me a little suspicious so I shot another roll and developed it in Microphen.  Turns out the Compact 120 6x9 has a low level general light leak, probably where the pieces go together but maybe also through the winders. Time to experiment with another camera.

I intended to develop the first role through this new camera with Microphen to double check for light-tightness, but I used the last of it on the roll from the Compact 120. I've had very little problem with light leaks with the Populist scheme, so I decided to go ahead with caffenol.  I used the standard C-M formula, but I added 6 grams of table salt (in 500 ml) as a restrainer since I was still using Arista 400.

I was very pleasantly surprised how well it turned out.

I started out on my bicycle to get some historic sights in Oshkosh.

I had to move into the middle of the street to get one of my favorite scenes - Boots Saloon, right across the street from a Catholic Church and Grade School. Only in Wisconsin.


An overgrown window in a dilapidated abandoned factory.  Once again, I wasn't paying close enough attention to making sure the film was tightly wound, and ended up with a curved film plane, which many people consider pinhole fun.


The giant sundial downtown in Opera square.


Speedboats stored on racks at the Mercury Marine Engineering Lab.


The roll sat in the camera for quite awhile while I waited for inspiration, but finally last weekend I decided to just finish it off around the house.

A sunbeam on the crystal doorknob in the bathroom.


A decorative pull on the curtains in the upstairs hallway window.


And another sunbeam in the corner of the kitchen next to the refrigerator.


I guess I'm warming up to black and white again. I've got plenty of washing soda, vitamin C and instant coffee left. I thought the Arista 400 was a bit grainy so I've gotten some of the 100.  Another lesson I had to relearn was to get some wetting agent.  I had significant scum marks on these negatives that took forever to retouch out.

Friday, July 1, 2016

Developing paper in Caffenol

When the coordinator of the local ArtsCore initiative and I were discussing the pinhole workshop, it came up in conversation that I was developing film in home-made developer and wasn't that kind of a pinholey thing to do. The idea that the ingredients in Caffenol had about the same danger to the environment that the waste water from your clothes washer and dishes have also seemed to work with the theme of the event: "Nature and her Tales."

As I began to panic about what I was actually going to do, I put the idea aside, but I've sort of caught up, and since I needed to practice shooting with 4x5 single shot cameras with paper negatives anyway, I mixed up a liter and gave it a try. (Don't you love it when I mix metric and imperial units of measure).

An immediate impression as I mixed it was that it sure was dark. I've been inquiring of teachers that I knew had conducted workshops and one thing they all emphasize about the response from the students was the magic of watching the image form in the developer.  That's not going to happen with Caffenol.  It's got 40 grams of instant coffee in it. Compared to that cup of coffee in your hand, that's probably about 2 to 4 times stronger. It is essentially opaque. Maybe if you were introducing pinhole to a group that already had experience in the darkroom, it would be interesting, but I'd hate to take any of the magic away from the experience.

But I already had it mixed when I thought of that, so I went ahead anyway.

I didn't do any specific research about it, but I've read a bit about Caffenol and never heard anyone mention developing paper in it.  I remember some internet discussion about using the same developer for paper and film so I thought it would probably work to some extent, but how long would it take to develop it?  Would it stain the paper (it really doesn't stain film)? Would you rate the paper at the same ISO rating? What kind of grey scale would you get?  The biggest caveat about Caffenol was that it tended to create background fogging on films rated 400 or over. I didn't think that would be an issue with paper.

I was using Arista RC Grade 2 Semi-matte, rated at ISO 5 in the f250 workshop camera.  It was a sunny day, and direct sun seemed like an exposure I could repeat fairly reliably for comparison. I even metered it and it agreed with Mr. Pinhole and my standard chart for paper.  A minute.

Somewhat randomly, I decided to start with 2 minute development.

The first negative looked pretty good, but it struck me when I first looked at it that it was a bit underdeveloped. The blacks looked like they could get darker but, I could get a pretty good scan from it.


The next two negatives seemed a little lighter than I'd like, but I couldn't tell if it was a case of a difference in exposure or something to do with the development.

The fourth picture, I decided to go with what I thought would be a lower contrast subject. It was in the shade so the exposure was a lot longer, but I didn't measure it, I just guessed (based on the standard chart) that it was about three stops lower. After two minutes in the caffenol, I pulled it out of the developer and it looked really thin, and although I tell everyone to wait to judge a negative until you look at it in room light, I decided to see if more development time would bring out more detail, so I left it for another two minutes. The extra development time definitely made a difference. The blacks are blacker, but I thought I was starting to see staining on the unexposed portions.

I still got a pretty good scan out of it

.

I realized that by taking a photograph and developing it and then going back out when the lighting conditions were changing, I wasn't going to get any real comparison.  So I loaded three of the workshop cameras and took three successive shots at the same exposure, and then developed them for 2, 3, and 4 minutes.

The two minute does look a little underdeveloped to me.  The three minute seemed pretty good, and the four minute seemed to have even better shadow detail, but the highlights seemed to getting a bit blocked up.

My best scans of the three.


The first is a little lacking in shadow detail, but despite the differences in the negatives, the last two look pretty good to me. If I was going to do this regularly, I'd probably pick the middle one - three minutes.

So, can you develop paper in Caffenol? Yes. Does it affect the response of the paper? Not really too much. Does it stain the paper?  Yes, a little, and the longer developments showed a little more staining, but it still wasn't too bad, and might have controlled contrast a little.

I'm still not going to use it in the workshop in order to let the participants watch the image form, but it would work.

Friday, February 12, 2016

More caffenol

I loaded the frozen roll of Tri-X into my Compact 120 6x9cm camera and gave development with Caffenol another shot.  Since I had pretty bad base fogging on the last roll, this time I used the Caffenol C-H recipe from The Caffenol Cookbook and Bible, recommended for use with faster films. The recipe calls for Potassium Bromide as a restrainer, but somewhere else on the internet I saw a note you could use plain old table salt, just ten times as much. The recipe calls for one gram of KBr so that's not as extreme as it sounds.

The base fogging was a little better.  Here is an old 35mm negative on top, compared to the previous roll on the left, and the new roll on the right.  It still looks like I have a ways to go.  I also think I may be fogging the film a little when I'm loading it.  Several negatives had what looked more like a light leak than overexposure. The next roll I'm going to try to load the camera in the changing bag to make darn sure that's not the problem.  And it is nearly 10 year old film, but it's been in the freezer the whole time.  If I still have a problem with the next roll, I think I'll have to buy a new roll of film to compare it to.

I did get a couple halfway decent shots, but nothing ready for exhibition yet.

I returned to the south kitchen window that had been a major subject when I was using black and white paper negatives.


And, when you can't come up with any other subject matter, a self portrait is always an option.


Saturday, January 16, 2016

Old frozen film and caffenol.

In my last post, I mentioned how I had sort of a reawakening of my interest in black and white about the same time I started working in color, but color won the day and I gave up the monochrome.

Several things have recently renewed my interest in black and white.  

All the while I've been using the Populist I occasionally built 120 cameras, often just to demonstrate that my cheap homemade paper cameras could produce just as good photographs as expensive, beautifully crafted wood and brass cameras you could buy. Most of the time I just wasn't that impressed by the difference the larger format made, but recently I've gotten intrigued by it. I kinda wanted to try the Compact 120 6x9 again but my inner cheapskate, however, kind of drew the line at the 6x9cm format as just too expensive to be fun.

Before I quit using the black and white, I bought 10 rolls of black and white 120 film.  I still had a roll of T-Max, one of Tri-X and four of Arista 400 in my freezer. I don't think my inner cheapskate would be offended if I used them up in the Compact 120.

Also recently I was reminded of caffenol developer. If you haven't heard of it, it's ingredients are washing soda, vitamin C, and cheap instant coffee.

Making your own chemistry is about as pinholey as it gets, but caffenol also has other advantages. Although the washing soda wouldn't be very good for you if you drank it, everything in caffenol is pretty non-toxic and something that is pretty safe to pour down the sink (I mean, it's washing soda).   Hydroquinone and Metol are some pretty nasty stuff.  In normal home usage quantities it's not all that bad to dump regular developer in the drain, but caffenol is less of an issue. And it smells a lot better.

The really big advantage is it's a one shot developer mixed from powder every time.  Liquid developers oxidize pretty fast, and there's always a warning with powders to mix the whole envelope. Since I only develop a roll of film now and again I hate the idea of not knowing if my developer is still full strength.

So I started with the T-Max since the caffenol.org web site said it was tested pretty well.  I used the standard Delta recipe, since there was a post on the site that said it worked well with T-Max.  I didn't notice until now that the writer said they doubled the amount of vitamin C.

For one of those things that don't sound like they could possible work, it actually developed the film, but with a few problems.

Here are three pictures. I always have trouble just shooting to test, so I went for a bike ride along the old manufacturing district on the Fox River, which seemed pretty appropriate to black and white.

The historical society has kept two fishing shacks preserved.  Manufacturers in Oshkosh paid workers particularly poorly to gain a competitive advantage, which led to a nasty strike in 1898, so the workers depended a lot on fishing in the Fox for food.


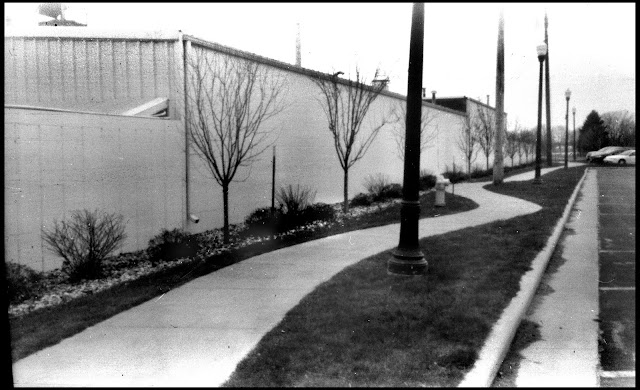
I love this side walk.  This used to be the road between Mercury Marine's Engineering Test Lab, still there on the left, and Radford Manufacturing, one of the wood products companies that Oshkosh was built upon, which was torn down sometime in the early nineties.  The streets in the area have been reworked several times since then. The street lights, power poles and fire hydrants were installed at different times, and when they decided to put this sidewalk in, it was cheaper to snake it around everything rather than move them.


This is the site of Morgan Door Company.  This Old House actually did two remote segments there. They moved out to the industrial park about ten years ago, the old factory was torn down, and the site has remained vacant since.  I thought it was funny to have these two piles of gravel there since the city spent years getting a construction materials supplier just across the river to move out of the downtown.


The negatives turned out all right, but the background fogging is pretty bad.   On the caffenol site there are several warnings that you might need a restrainer with faster films, but they're divided between those that say you're OK up to 400, and some saying 400 and over.

I think I'm with the 400 and over crowd.  Luckily, common table salt is one of the options for a restrainer, so I think I'm going to add that next time.

Unfortunately, there's no mention of Tri-X or Arista 400 at all on the Caffenol site, but they do refer to Ilford HP5 and the recommended development times are roughly similar. Anyone have any tips on using caffenol?