

Follow this link for the original post describing the Variable Cuboid Pinhole Camera System. This link leads to other posts about the development and use of this camera.
If you are going to build one of these, you should review the 10th Anniversary Populist post for details on my methods. I’ll just repeat a few basic principles of cardboard camera craft here:
- Roughen any glossy printed surface before gluing. The most common reason things come apart is a glossy surface that hasn’t gotten sufficiently roughened
- Use enough, but not too much glue spread in a thin layer completely covering the surface you’re gluing. The other reason things separate is little gaps in the layer of glue.
- Dry fit everything and rehearse clamping and gluing before applying wet glue. You don’t want to figure it out when it’s covered with wet glue.
- If any corners or edges peel away or delaminate, reattach them right away with a bit of glue.
- Keep a damp paper towel handy to clean your fingers and any stray glue.
- Wait as long as necessary to let glue dry between steps. I won’t be repeating this at every step.
Supply list
A note on measurement: I’m going to mix metric and imperial units. The film format and length to the pinhole I always think of in metric terms and I use millimeters most of the time when I’m measuring. I’ll mostly use inches when referring to some product sizes. I’ll include metric equivalents, but I can’t be sure how they’re referred to in hardware stores outside the U.S.
- A print of the template
- A good supply of packaging cardboard or a similar weight poster board. You’ll need about two 24 can beverage cartons worth. The longest piece is about 432mm.
- A 100mm x 200mm piece of 3/16 inch (5mm) foamcore, or equivalent thickness cardboard.
- A ¼ x 20 T-Nut with a 1/4 in. (6mm), 5/16 in. (8mm) or 3/8 in. (10mm) shaft
- Relatively coarse sandpaper to roughen surfaces with
- White glue made for permanently bonding paper. I use Aleene’s Tacky Glue.
- Wax Paper
- A decent pair of scissors
- An #11 craft knife like an Xacto. Several blades.
- A ball point pen
- A straight edge
- A bag of clothes pins for clamps.
- Two 1½ inch (38mm) binder clips.
- Four more 1½ inch binder clips or seven ¾ inch (19mm) binder clips
- Several rubber bands that will go around the camera, but hold fairly tight.
- About 125mm of 3/8 inch (10mm) dowel in oak or some other dense, strong wood.
- 160mm of 3/8 inch (10mm) dowel of any wood.
- A small saw. I use the cheapest coping saw I could find.
- Maybe a vice grips or some other vice like device for holding dowels for cutting. I made a couple really simple jigs to make this easier.
- An empty 120 film reel
- A pencil
- A large black marker like a Sharpie.
- Corrugated cardboard from typical shipping boxes. How much depends on how long your fronts are.
- Flat black paint. I use Krylon spray paint.
- Of course, you’ll need film in order to take pictures.
The film holder
The film holder is made of two parts, front and back.

Begin with the film holder back. Score and fold.

Clamp the flaps at the top and bottom.

One at a time, unclamp the flaps, apply glue and reclamp them,
Score and fold the film holder front.

Clamp together the front and back of the film holder. Make sure the counter holes are aligned and everything is square.

One at a time, unclamp the top and bottom, apply glue, reposition and reclamp.

Glue the templates for the film holder bases and film holder top on the foam core and trim them to size. If you had some corrugated cardboard that you could laminate together to make the equivalent depth, you might be able to use that, but I haven’t tried it. Cut out all the holes. If you haven’t cut foam core before, practice this a little. Use a sharp blade and multiple light strokes.

If you have a t-nut with a 3/8 inch shaft, engrave a few millimeters of foam out of the opening on the base top to inset the top flange of the t-nut. If it’s 5/16 in., engrave about 2/3’s of the first layer of foam to inset the t-nut, and if you have 1/4 in. shaft, cut out the whole first layer (before you glue them together). In these two latter cases, you’ll have to glue in little circles of card stock in a sufficient number to fill in the gap so the tripod screw doesn’t just push the nut up when you try to attach it. It’s important that that the t-nut extends two millimeters underneath the film holder. It has to go through four more layers of cardboard before it gets to your tripod screw.

Glue the two pieces of the base together with a few bits of dowel inserted into the outside holes to make sure they’re aligned. Once you’ve got your clamps on, remove the pieces of dowel so they don’t get glued in.

Cut the top and base of the film holder at the line. Mark the orientation of the pieces you’ve cut off so when they become part of film holder frame they’ll match exactly.

Notice I broke the edge of one of the holes when I made this cut. That will be all right when it gets glued together as long as there’s enough of the hole left to position the dowel.
Cut two pieces of 3/8 inch dowel 80mm long. Cover them with pencil graphite which will give them a slippery surface for the film backing paper to ride over.

Insert the t-nut and any layers to fill in the space in the top and press it in as far as it will go.

Insert the dowels through the top, film holder and base.

One at a time, remove the top and base, apply glue, reposition them on the dowels and clamp them.

With a bit of sandpaper, make the edge the film rides over a bit less sharp.

Cut and fold the film gate and the film gate base. The base needs to be cut out of two layers of cardboard laminated together. Be careful cutting out that opening. It’s going to be the edge of every picture you make with this camera.

Glue them together making sure the openings align well.

Glue the template for the A and B flaps of the film holder frame aligned with the middle part of the template (it had to be in pieces in order to fit on letter/A4 size paper). This piece is going to be just under 430mm long. You can see that it crosses over some of the fold of the original carton. It will be OK when these two are glued together. If you have to make a splice to get a piece of card big enough, put it in the middle of one of the bottom pieces and hold it together with tape on the outside. It will be a little floppy, but will be solid when it’s glued together. After you cut it out, fold over and glue the sides to make a double layer to make the sides stiffer.

Lay the film holder on it’s back. Wrap the film holder frame around it with a bit of wax paper between them at the bottom where stray glue might glue them together. Glue and clamp the bottom of the film holder frame. Notice the corner where the template is peeling away a little. Glue those kind of things back down as soon as you see them.

When it’s dry, take them apart and remove the wax paper. Remember that the shaft of the t-nut is extending through the frame, so you’ll have to spread it slightly to get it apart.There may be bits of wax paper that stick that you’ll have to pick off.
Put them back together and again with the frame lying on it’s back, place the pieces of foam core you cut off the film holder top and base in place. This is one of those steps where it would be more trouble than it’s worth to get waxed paper between them to protect against stray glue sticking the parts together. In that case, as quickly as you can, carefully apply and spread the glue, apply the clamps, then remove the film holder. You’ll need 1 1/2 inch binder clips to clamp the bottom.

When dry, put it back together and glue and clamp the film gate in place. As soon as you get the clamps on, remove the film holder. Again, you’ll need binder clips to effectively clamp this.


Glue the two pieces of the base together with a few bits of dowel inserted into the outside holes to make sure they’re aligned. Once you’ve got your clamps on, remove the pieces of dowel so they don’t get glued in.

Cut the top and base of the film holder at the line. Mark the orientation of the pieces you’ve cut off so when they become part of film holder frame they’ll match exactly.

Notice I broke the edge of one of the holes when I made this cut. That will be all right when it gets glued together as long as there’s enough of the hole left to position the dowel.
Cut two pieces of 3/8 inch dowel 80mm long. Cover them with pencil graphite which will give them a slippery surface for the film backing paper to ride over.

Insert the t-nut and any layers to fill in the space in the top and press it in as far as it will go.

Insert the dowels through the top, film holder and base.

One at a time, remove the top and base, apply glue, reposition them on the dowels and clamp them.

With a bit of sandpaper, make the edge the film rides over a bit less sharp.

The film holder frame
Cut and fold the film gate and the film gate base. The base needs to be cut out of two layers of cardboard laminated together. Be careful cutting out that opening. It’s going to be the edge of every picture you make with this camera.

Glue them together making sure the openings align well.

Glue the template for the A and B flaps of the film holder frame aligned with the middle part of the template (it had to be in pieces in order to fit on letter/A4 size paper). This piece is going to be just under 430mm long. You can see that it crosses over some of the fold of the original carton. It will be OK when these two are glued together. If you have to make a splice to get a piece of card big enough, put it in the middle of one of the bottom pieces and hold it together with tape on the outside. It will be a little floppy, but will be solid when it’s glued together. After you cut it out, fold over and glue the sides to make a double layer to make the sides stiffer.

Lay the film holder on it’s back. Wrap the film holder frame around it with a bit of wax paper between them at the bottom where stray glue might glue them together. Glue and clamp the bottom of the film holder frame. Notice the corner where the template is peeling away a little. Glue those kind of things back down as soon as you see them.

When it’s dry, take them apart and remove the wax paper. Remember that the shaft of the t-nut is extending through the frame, so you’ll have to spread it slightly to get it apart.There may be bits of wax paper that stick that you’ll have to pick off.
Put them back together and again with the frame lying on it’s back, place the pieces of foam core you cut off the film holder top and base in place. This is one of those steps where it would be more trouble than it’s worth to get waxed paper between them to protect against stray glue sticking the parts together. In that case, as quickly as you can, carefully apply and spread the glue, apply the clamps, then remove the film holder. You’ll need 1 1/2 inch binder clips to clamp the bottom.

When dry, put it back together and glue and clamp the film gate in place. As soon as you get the clamps on, remove the film holder. Again, you’ll need binder clips to effectively clamp this.

The film axles and the winders
Now you’ll need to make the film axles and the winders. Both are essentially the same - a piece of 3/8 inch dowel with a tab cut into the end that inserts into the film reels. The film axles are a little shorter and go in the double layer of the film holder on the bottom. The winders go in the top, but need to be a little longer so you can grip them. I also glue a knob around them for something that’s easier to grip and provides a little torque.
In order to make it easier to hold the dowels while making these cuts, I’ve made a couple simple jigs. For the winder, I need a piece 25mm and for the film axles 17mm. (If you’re not going to add a knob, make the winder a little longer, 30mm, so you can get a grip on it.) A piece of 5/4 inch board is almost exactly right for the winder, and a 3/4 inch board for the film axle.
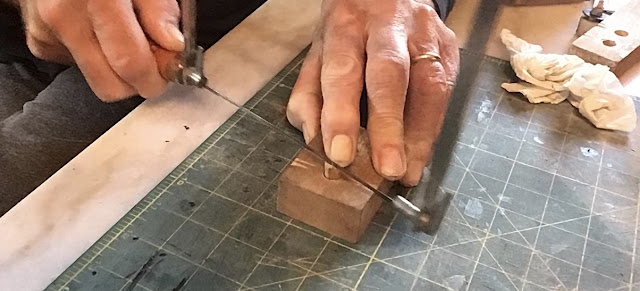
I drill a hole completely through the board. I cut off the correct length holding the dowel against the table.

The second hole is drilled to the correct depth to leave the right amount for the tab sticking out. If the hole is too big and the dowel spins, put a bit of tape over the end to make it fit more tightly. If you’re using a pliers or vice to hold the dowel, mark a pencil line about 7mm from the end of the dowel. On the end of the dowel, eyeball the width of the tab and draw a pencil line. I try to be generous and then whittle the tab to the correct width later. Guiding the saw with a finger, cut down to the jig or to the line.
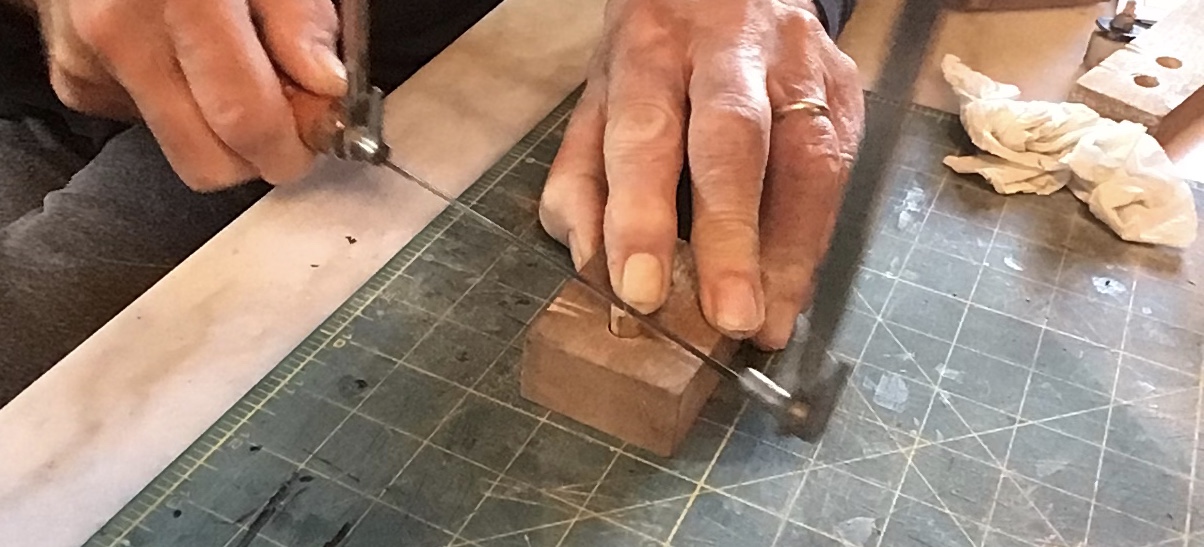
Then turn the jig or pliers and cut the tab. Be careful not to go too far and cut into the tab you’re trying to make.

Both shoulders should be even.

Whittle the tab to be narrow enough to fit into the slot of the film reel. I also round off the corners a bit to make it easier to find the slot in the reel.

It should insert all the way to the shoulder.

Put some 120 film reels in place in the film holder (One of them could be your fresh roll of film if necessary). Insert the film axles through the bottom of the film holder into the slots. Then insert the film holder into the film holder frame and insert the winder dowels making sure they’re seated in the slots of the film reel. Draw a pencil line around the dowel.

Make the winder collars from a double layer lamination of your card stock. When cutting out the winder collars, it’s best to cut the holes first and enlarge them with the piece of dowel and then cut out the collar.
Whittle a groove around the dowel to give the glue something to grab onto.

These small dowels are a little hard to grip and don’t provide much torque. I prefer to glue them into some kind of knob. I like to use the cork wine stoppers with plastic cap that you find in olive oil and balsamic vinegar boutiques, but I have used a bit of regular wine cork. If you can drill perpendicular holes in the exact center of things, it would be pretty easy to make them out of a 10mm high disk of broom handle.
The camera back needs to slide between the winder collar and the winding knob.
First, cut off the cork as close to the cap as possible.

Then, cut a vertical circle with the Xacto knife.

Cut and scrape out the cork so the dowel sticks in all the way to the plastic top. Remember, there needs to be a gap between it and the collar for the camera back to slide between. Crimp the dowel with a pliers or scratch some grooves into it for the glue to grab onto and glue it in.

Cut and fold the camera back. With the winders inserted slide the back between the winder knob and collars and form it around the film holder frame with some wax paper between them. One side at a time, glue the flaps down and clamp it all around with rubber bands. The flaps won’t come completely together. Try to get them square with an even gap.

Cut out the parts for the counter shutter.

It’s construction is detailed on the 10th Anniversary Populist post. Glue it together. Be careful applying and spreading the glue so you don’t glue the slider in place.
Glue it in place over the hole in the back of the camera. When you place the rubber bands on to clamp it, check that they haven’t pulled the shutter out of place. Adjust the rubber bands until they hold the shutter without moving it.

The camera front
The front supplied with the template is 55mm. To make it shorter or longer, cut or extend the top and bottom and the sides of the camera to the pinhole distance you want. I’m making a 35mm front so I’m cutting 20mm off as indicated on the pencil lines

I’m also making a 100mm front. When making a longer front, you would extend these sides to the length you wanted.

The shutter goes on the front. There are three options. The simplest is a single pinhole on the axis. The template for the single shutter is on any of the Populist templates. The shutter included on the template for the Variable Cuboid is a double shutter for over and under axial and rising pinholes. It’s made exactly like the single shutter, except the moving part is cut in half as on the Evil Cube.
For these fronts, I’m going to make a continuously adjustable rising shutter. The template is a separate file.
It’s much easier to construct the shutter before folding and glueing the front into it’s final shape. Score and fold it before starting. Cut out the parts for the shutter. The parts that go against the front of the camera need to be blackened with a Sharpie as well as a border around the hole in the front. I have since changed the parts of the shutter to be longer on the bottom to provide for better overlap.

Glue the outside parts of the shutter together. It goes together just like my original single shutter, except the with the extensions out the side, and the flaps on the side of the shutter facing the body.

Insert the tabs through the camera front and the inside panel and fold them over as best you can. Be really careful with the glue here so it doesn’t get glued in place.

As soon as you’ve got the glue under the tabs, place something flat with a little weight on it.

Turn the camera front over and glue the single weight shutter guides under the shutter extensions.

Glue on the double thickness middle layer of the shutter guides which define the limits of movement of the shutter.

Glue on the double layer top shutter guides which hold the shutter on and keep everything tightly up against the camera body.

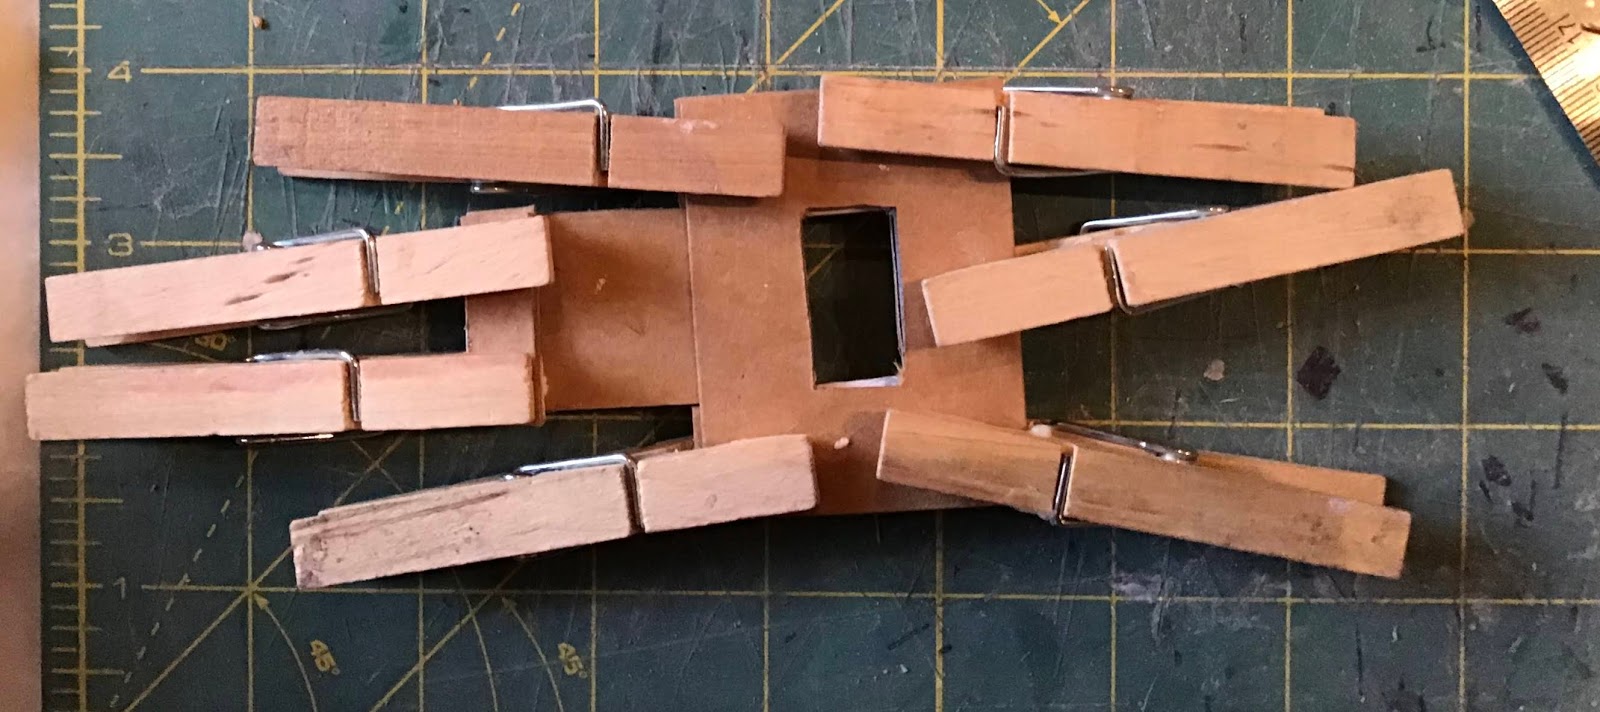
I forgot to take a picture of this earlier, but these parts can be clamped with clothespins if you fold the side flap all the way over.

Cut four pieces of corrugated cardboard the width of the side flap and 10mm shorter than the pinhole distance of your front. Make these pieces oriented so that the end where the internal corrugations are visible will be facing out when the front is glued together.
These corrugated cardboard parts and two more that will be added to the top and bottom later on have several functions. They make the sides stiff. This isn’t a problem with short cameras, but with long ones these sides can be clumsily floppy. They also form a stop so the front goes onto the camera back straight and at exactly the right distance.
Corrugated cardboard is preferable for these for two reasons. The foam in foam core is soluble in spray paint, paper isn’t. Once painted black the open tubes formed by the corrugation is a nearly perfect black hole to catch any any stray photons that make it down the light trap.
Glue them into two double layer pieces. Glue them to the flaps so they will be right up against the front when it’s folded together.

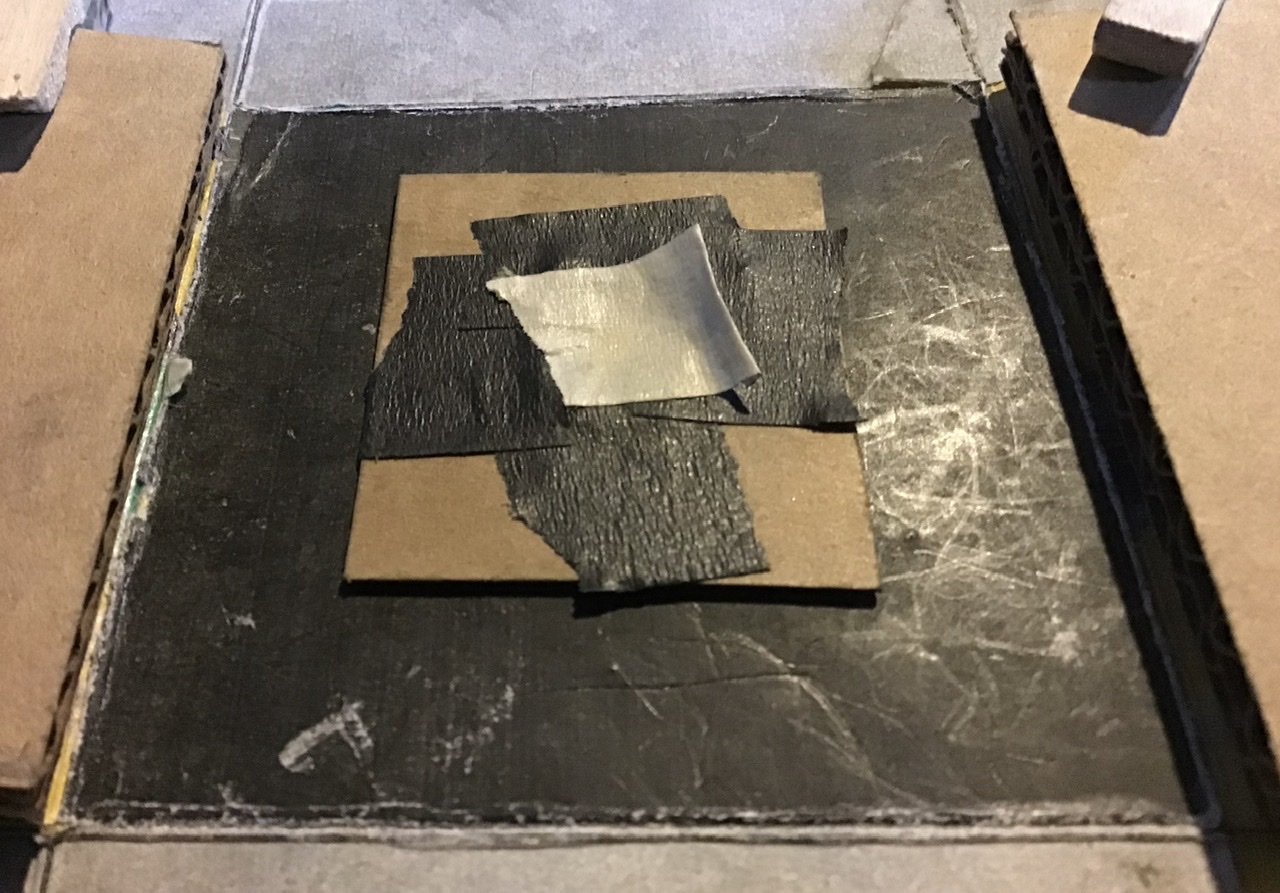
If like me you can’t get your hands inside of one of these things, install the pinhole before continuing. Since you’re going to paint the inside of this thing, mask it with a piece of tape, maybe with a little folded over handle so you can get ahold of it to remove it. DANGER! WARNING! Remember to remove this piece of tape before trying to take pictures. I did this recently and read on Facebook about someone else making the same mistake.
If you’ve chosen the option to have one or two pinholes fixed into place, you can make a pinhole mount. Make a strip of cardstock the width of the eventual opening, long enough that it can be folded to match the front of the camera with sides long enough for you to put it down against the front and tape it in place. With it inserted into the camera, trace the openings through the front of the camera. It has to be completely blackened too. Then you can install the pinholes with it after all the painting is done, and easily change them if you need to.
Now fold the front over the film holder and back so that the cardboard stops hold it at the right distance. The flaps probably won’t come right together, but try to keep them square. This can be a little tricky to do. You can hold the front against the back with a rubber band that’s just strong enough to hold it in place. Another option is to tape it to the back at the top and bottom. Note that there may be a little gap between the front and the back. (BTW, I’m going to alternate between pictures of the 35mm and the 100mm front)

Glue the flaps. As soon as you have, clamp the front with a rubber band and remove it from the back and clamp the sides.

Now cut the corrugated cardboard stops for the top and bottom so they just fit between the ones on the sides. Since the panel inside the moving shutter has to travel all the way to the top of the box, I’m making the top one 10mm shorter so there’s a gap for it to move in. I’ll have to be careful to align it with the others in the back. Glue them in place.

The light trap.
The light trap is made from a strip of your card-stock about 430mm long, - long enough to go around it with a double layer at the bottom. With shorter cameras I have sides that extends all the way to the front but that may be problematic with a longer camera. (Although I just did it with the 100mm front. That really makes a strong box.) The light trap goes all the way back to the winders and needs to have enough overlap of the front to give you a good gluing surface, about 25mm. As with the film holder frame, if you have to make splices, make them in the double layer at the bottom. It’s important that the the light trap fit tightly around the back. Form this around the back as tightly as possible. So you’ll have square corners, after you form it around the front, starting at the top corners, give them a good sharp crease, and then reform the bottom corners if they’ve moved and give them a good crease.

Starting with the top, apply glue to the front in a thin layer being very careful not to extend it over the edge so you glue the front and back together. As you get each side done, hold it against the table and keep it in place with one hand while you finish the other sides. As soon as you get done, clamp around it with rubber bands near the front to keep everything in place, remove it from the back and clamp it.

The moving shutter will probably be loose enough that you can’t open the shutter without pulling it up. Cut a piece of card stock exactly the width of the shutter about 10mm deep. Blacken it on one side. Apply a thin layer of glue and slide it behind the shutter with the black side facing the camera body and glue facing the shutter. That will probably make it tight enough to stay in place when you open the shutter, but it may require a second one of these.

Viewfinders
Viewfinding is done with sighting triangles made from double layer card stock, 60mm at the base and as long as your pinhole to film distance. Glue them on with the point aligned with the pinhole and the base parallel to the front. Note that on the sides, the pinhole and the image plane will be 5mm above center. If you’re using two pinholes insert beaded pins in the front and indicate the location of the film plane with a card stock line. If using the adjustable rising front, insert the beads in the sliding part of the shutter.


Light proofing
Because I’m a little concerned about it getting sticky and dissolving the foam core layers, I just blacken the film holder and the film holder frame with a sharpie. The only place opaqueness is an issue is on the sides of the film counter chamber where there’s only one layer of cardboard between it and the film. It’s only exposed to light when advancing the film and you should be doing that in subdued light, but be particularly liberal with the Sharpie on the side that faces the film.
The light trap will extend over the back to the winders. Blacken that area of the back with a Sharpie.
The light trap will extend over the back to the winders. Blacken that area of the back with a Sharpie.
The inside of the front and back of the camera should be painted with 2 or 3 good coats of flat black spray paint.
If you’re concerned about a damp climate as in Cambridgeshire or the Carolina coast, a few coats of clear spray acrylic will probably make it as waterproof as a digital camera.
Loading the camera
Since you’ve been so patient reading this extremely long post, I’ll let you sit back and watch a video on how to load it.
In the video, I forgot to put a rubber band around the camera after I put the front on. It’s liable to fall off and expose your film if you don’t use one.
If you see any errors or easier ways to do something, have any questions or any comment in general, please let me know.
If you make one of these, I’d love to see pictures of it and the pictures you take with it to feature here at Pinholica.
No comments:
Post a Comment