F295 was an international discussion forum begun and administered by Tom Persinger. Originally just about pinhole photography, it expanded into all kinds of alternative methods. It was active from 2004 until 2015 but it remains on-line. Recently it disappeared from the web for a few days, and that prompted me to decide to reprise some of my favorites here at Pinholica, for backup if no other reason. On Facebook today Ric Johnson posted a link to a ten-year-old story on a Twin Cities web site about a meeting of the League of Upper Midwest Pinholers, a group mostly consisting of folks from the Twin Cities, but which also included several members from other states including me by virtue of my attendance once at the invitation of Tom Miller who used to organize these events at the Minnesota Center for Photography. (That’s how I got involved in Worldwide Pinhole Photography Day,) They continue to meet on an irregular basis, but for a few years it was always on the first weekend in November, usually announced on the f295 forum. I’ve only attended the one meeting but I always tried to take a picture relating to it on the day they met in Minneapolis. On the day referred to in Ric’s post, I did this piece, posted on November 18, 2009 under the title: LUMP East.
Following a tradition of at least a couple of years, the Eastern Division of the League of Upper Midwest Pinholers mounted an expeditionary force to scale Mosquito Hill while the main body of the League was meeting in Minneapolis.
Beginning at the bottom of the North face.
Taking the official footograph was a bit of a challenge due to ground conditions at this time of year.
At the summit.
I don't think they perform this part of the ritual over there in Minneapolis.
And in recognition of the featured presentation by Marv Thompson and with a tip of the get well soon hat to Earl Johnson, here's a shot which includes a bridge.
All with the Populist. .15mm pinhole 24mm from 24x36mm frame.
We were given samples of photographs from the Museum Archives to be inspired by for the Reimagined Rephotographic exhibit, now titled “Then and Now.” There were many examples of interiors of businesses with the employees posing for the camera. I’ve rarely asked people to pose for my pinhole photographs and when I did they were participating in some sort of public event. Also in those cases the exposures were outside and only a few seconds long. Getting people to stay relatively stationary for interior exposures seemed like a big thing to ask for.
Chatting about this to the curator organizing the exhibit, I mused that it might make it easier to get access to business interiors and getting people to pose for me if I start out with “I’m working on a project for the Oshkosh Public Museum. . .” She said that sounded like fun.
So one day I walked around downtown, measuring exposures and asking a few people if they would participate in a pinhole photograph. The response was pretty positive.
About a week later, I loaded the Variable Cuboid with Portra 400 and started my quest.
I began at Camera Casino. They’re naturally curious and encouraging about photography. They know me and my odd methods. I set up facing the main counter near the windows. One discovery is that everyone fills the windows with merchandise so they contribute very little to the interior illumination. I held my phone with the timer running near the camera so they had something to concentrate on and kept up a running conversation so they would appear somewhat natural (and of course, also somewhat blurred.) During the exposure I learned that the guy on the left is the son of the owner.
My next stop was the Natural Foods store just down the block. One of the archival photographs was a grocery store on Main Street. I had originally intended to photograph the produce section in the next room, but when I entered from the back, I was taken by the vintage lamps and the tin ceiling contrasted with the modern arrangements of the supplements and herbal remedies. There was clerk behind the counter to the right, but she moved too much to appear on the negative.
One of the archival photographs was of a bike shop. Winnebago Bicycles took care of my old beater Timberlin for years and I bought my new bike there so I know them fairly well. The owner is the one in the foreground. That’s my bike on the repair stand behind him. He’s holding one of my new studded winter tires. It helps to be a customer.
These exposures in fairly well lit spaces were in the two to three minute range. I went into a couple other places and measured exposures that were twice as long. I had ordered some Lomography 800 and decided it would be worth while to wait for that to continue. When it came, I loaded it into the new Variable Cuboid back so I could use up the Portra where exposure time wasn’t an issue and use the Lomo to reduce the time people had to stay still.
A hardware store interior was included with the archive images, so I went to Kitz and Pfeil. There’s not an obvious owner or boss who could give permission to let their employees pose, so I just went ahead and tried to get a picture without asking. I set up with the camera back against a shelf where it was as out of the way as I could get it. Just before I opened the shutter, a customer asked me what I was doing. I explained about the Museum project and pinhole photography. He was a life-long resident of Oshkosh and kept me in conversation for quite a while. He had been standing right in front of the camera but eventually he moved to the side and I opened the shutter. One of the employees came by and I expected to be told I was right in front of something they needed to get at but instead she said she overheard us and loved pinhole photography. She asked me if I knew about some other pinholer whom she said created “real art.”
The patron told me that the building originally had been a JC Penney’s. The stairs used to be an escalator. He loved to ride it when his parents had brought him there as a child.
Mojo’s is a vintage video game, VHS tape and DVD store. I told all the people who agreed to be in my pictures that if a customer came in, they should just forget about my photograph and take care of business. This was about the darkest place I had to deal with and about a minute into the exposure a father with his little boy came into the store. It turned out it was the father who was looking to get games for his original NES system, which were in the locked cabinet right behind my camera. The clerk had to leave my composition and she deftly retrieved the items without bumping the tripod.
Satori Imports is in the former Spoo Brothers Clothing Store. There is the interior of a men’s clothing store in the archive, but it’s not specified which one. There’s also an exterior picture of one of the Spoo brothers when he was a young man working at the Continental Clothing Store. Satori offers a little bit different style clothing and accessories.
It was still early and some of the smaller shops downtown weren't open. I stopped to get coffee and a pastry at The New Moon Cafe which was originally Bauman’s Drug Store in the corner of the Beckwith House Hotel. The woman whose face you see on the left asked if it was a pinhole camera as soon as I put it on the tripod next to me. We conversed for a moment and I opened the shutter and sat down. Almost immediately she and her husband stood up to leave. He's putting on his coat during most of the exposure. This was with the 35mm front. People just don't realize how wide angle pinhole cameras can be.
Despite the wideness of the angle, I decided it needed the 20mm front to really take in the scene. It felt kind of odd with my hands in the changing bag in my lap under the table. I used to work with one of the women in the red coats at the University. She was having an important meeting about the Oshkosh Food Co-op at the coffee shop.
Across the street is the First National Bank building. It’s cavernous lobby is featured in several images in the museum archive. All the offices around the perimeter are working businesses but they also use the space for events. During the exposure, two workers were setting up for weddings that evening and the next morning. They told me if I came back then the place would be really decked out and full of people. Everybody I dealt with seemed really proud of the place they were working.
There are at least four CBD stores in Oshkosh. Their presentation varies from just better than a bait shop to this one downtown, which is very neat and fashionable and reminiscent of a tourist attraction I visited once in Massachusetts. The clerk was a well dressed young woman, probably a college student. The cannisters on the table contain buds of what look exactly like the other type of cannabis, down to being labeled as indica or sativa. I asked her what people do with it. She said they make tea. It’s very relaxing.
Continuing down the block is another person I already knew, Jim Evans who owns the Art Haus, an art supply and framing store. Instead of a doorbell to announce customers’ entrance, he has a dog, who woofs casually to let him know someone’s there. It’s amazing that with the 20mm, I could get a full length portrait in the narrow aisle. Unfortunately it’s barely well exposed in the middle and barely there at the edges and it shows. I liked this angle because you can see some of the vintage cameras over his shoulder. He used to have 300 of them displayed, mostly folders, but he said he’s gotten disciplined and now has only about half that in the store. He’s been shooting 4x5 with a Speed Graphic lately.
A little unsure of myself with the 20mm in this situation, I also did one with the 35mm from another angle.
Several grocery stores on Main Street are in the archive. Today, in addition to the Natural Foods Store, there is Ski’s Meat Market, kind of a boutique grocery with lots of special brands. I was concerned about this point of view because of the east side of a cow facing west over the cheese display until Sarah told me farmers know that’s the end you have to take particular care of.
In the back is the butcher shop, frozen foods and produce with a very contemporary ceiling full of paper lanterns to soften the spot lights.
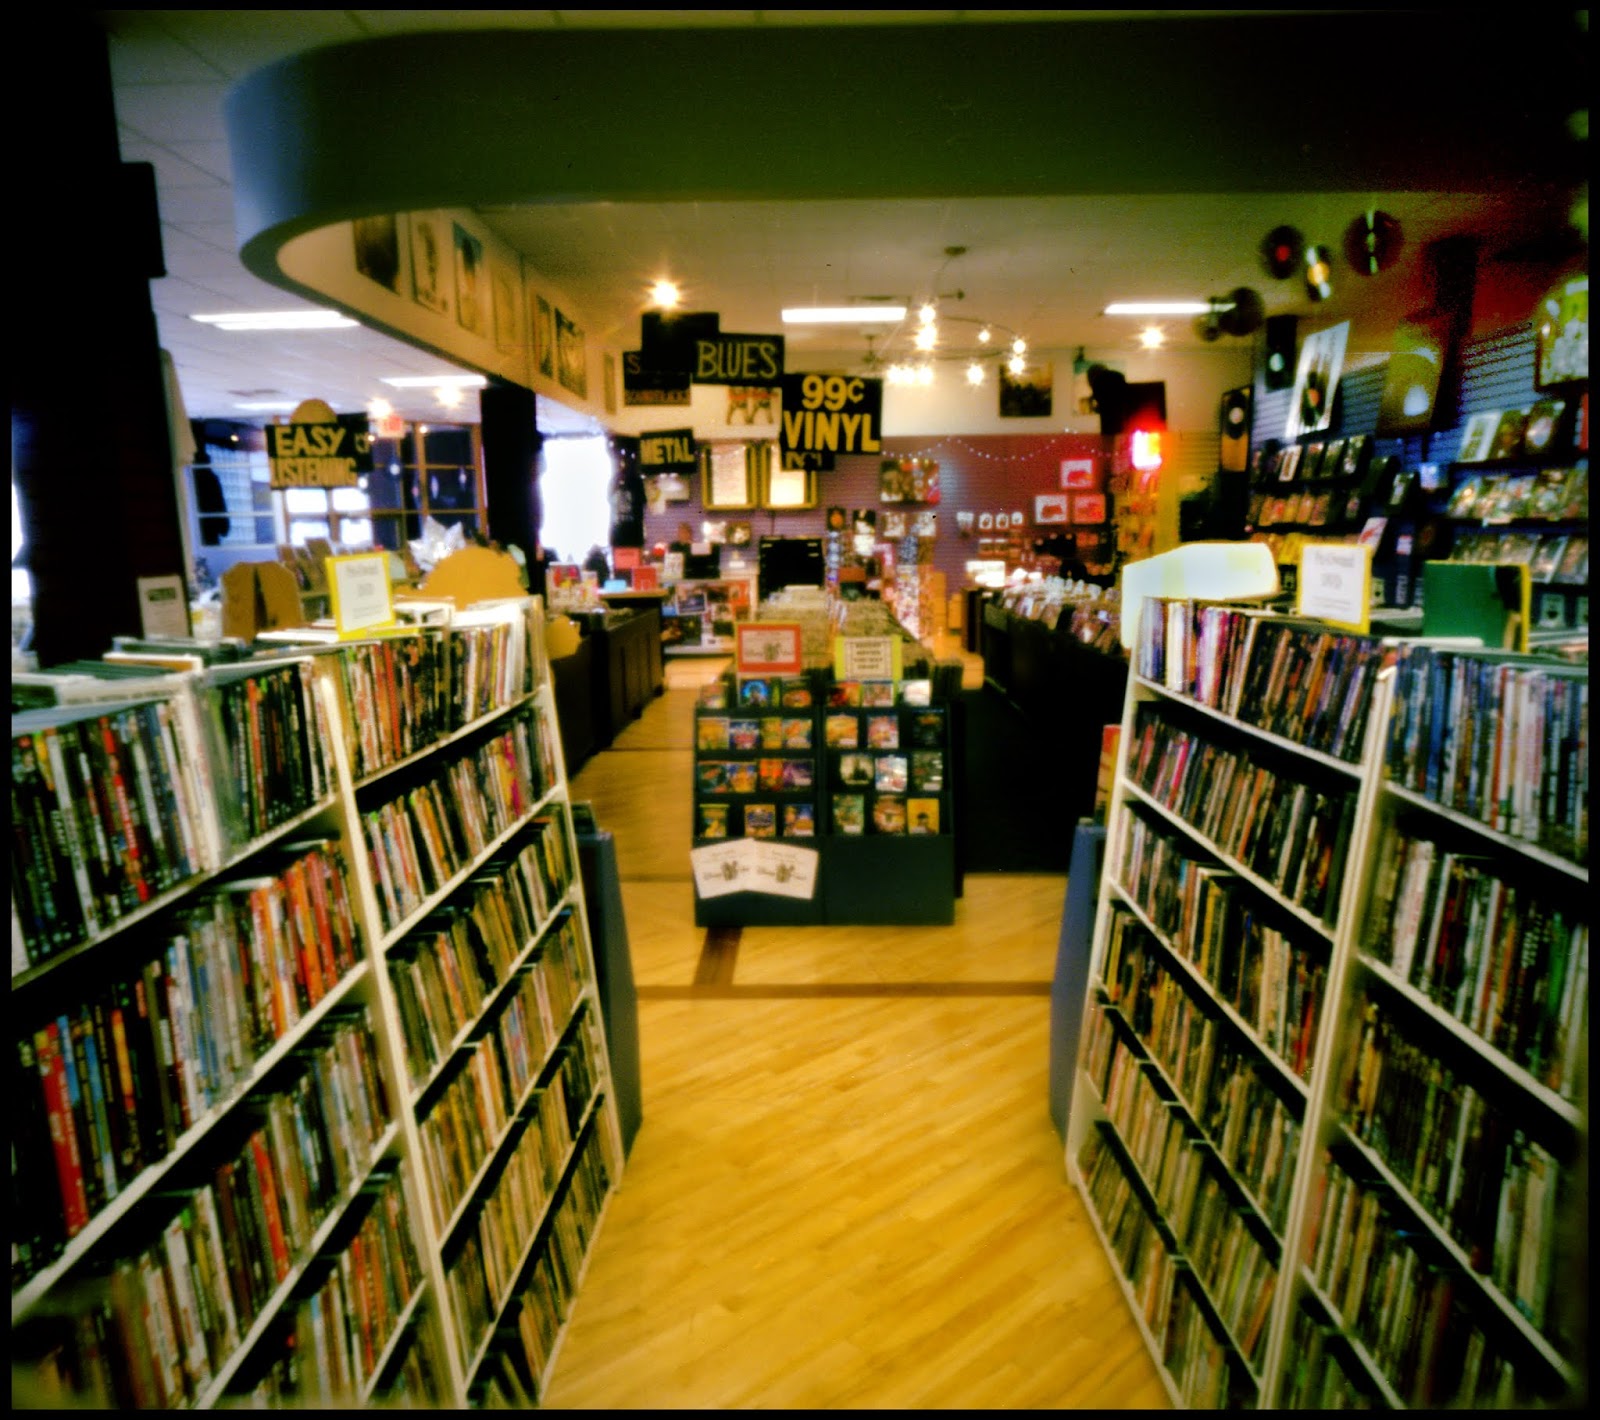
The Exclusive Company’s building was originally a Woolworth’s. The picture of the interior in the archive is a shot of a long hall with merchandise on either side. The closest I could come was from next to the back door in the electronics section. I thought it was funny to have a turntable in the foreground of my contemporary interpretation. How about that combination LED/incandescent/fluorescent/daylight illumination?
The front is the recorded music store, with the same kind of categorized bins we’ve been flipping through for years. As with the view from the back, it cracks me up that LP’s are the theme of one of the “now” photographs.
I had found out that a lot of the addresses I had been scouting of the exteriors of buildings were different from the ones in the museum archive descriptions. Prior to 1885, every builder did what they felt like but then the city enacted a uniform addressing code. The only way to find out where an older address is now is in a binder in the local history section of the Oshkosh Public Library. This is the dome in the original building with a big artificial tree underneath it waiting to be decorated.
That weekend was the holiday season kick-off for the indoor Winter Farmer’s Market, held in the lobby of the Menomonie Nations Arena. I went early to see if I could get some pictures. Santa was willing and there were no youngsters nearby. As soon as I opened the shutter, one of the volunteer photographers for the Market came up to me and began asking about pinhole photography. Despite the conversation going on in front of him, Santa held still for two minutes except for moving his right index finger.
The arena is on the site of the Buckstaff Furniture Factory which was in operation until 2010 and razed two years ago. I searched the archive before I went and found a picture of a woman working there amid a maze of belts and pulleys. I thought the contrast of people selling vegetables and handcrafts in the same location might be interesting. I’ve since gone back to get a closer view of some of the vendors.
This was all a little bit out of my comfort zone so I was getting impatient to get the film developed. Since I was going there anyway I took along the Cuboid kit to the Public Museum. I got there about 10 minutes before they opened. The estate was given to the city specifically for the Museum in 1922. One of the archive images is of the Grand Staircase. This was the morning after the Museum Auxiliary Gala. The exposure was going to be about 20 minutes. I opened the shutter and ran upstairs to let them know where I was and ran back down to babysit the camera. At least two staff members passed it while I was gone but they both assumed it was something I was doing.
One of the other pictures was of the library, now the venue for most of the public events and lectures.
I find myself with an embarrassment of riches with too many pictures. There’s five photographers involved and the gallery is not all that big. I’m going to have to do some gleaning before submitting archive/contemporary pairs for the exhibition.
I think they might have unleashed a monster.There are lot’s of places around downtown I want to photograph and my reluctance to ask people for cooperation seems unwarranted. In three cases, I had offers to go into parts of buildings the public normally doesn’t have access to.
You’ve heard this one before. You can’t make a camera and not try it out.
For the post about building the Variable Cuboid System, I made a third film back and a new 35mm front with the fully adjustable rising pinhole. I have to report that it took a while to make with all of the little holes to cut out and steps to wait for the glue to dry. It took me six days and an additional four days for a new 100mm front. It was pretty straightforward however and everything went together just as I expected.
One thing I’m very pleased about is that all the fronts I’ve made previously fit on the new back, and the two new fronts constructed around this back fit backs number 1 and 2. Interchangeable parts are the defining feature of a camera system.
But ya gotta go take pictures with it. I really wanted to get this done in order to use it for the Reimagined Rephotographic project.
It snowed. I shoveled. It’s going to be a long winter, although it’s in the mid-40’s and raining right now.
Around the corner is the Glad Tidings Tabernacle. I wonder if the inside is as plain as the exterior.
I drove to the other side of the river to South Park, the second largest in the city. I’ve never taken photographs there. It features a meandering water feature with a few wide pond-like spots.
This was half way across the park from the parking lot. It was really cold and windy to be standing around waiting for pinhole length exposures. Maybe that comes out in this bleak view of a cluster of bare oak trees.
On the way back to the car, it gave me a bit of a warm feeling finding this new playground with it’s mission of diversity.
Frozen or not, I gotta keep at this. I warmed up a bit in the car while driving downtown. This building has only two storefronts on the first floor, but it must have a lot of little apartments or offices on the second and third. Another composition that screamed out for my square format and I’m always attracted to bricked over windows.
Just around the corner of the building where I can escape the wind in an entryway during the exposure, looking across Merrit Avenue at the Wagner Opera House. The bottom floor on this side is the bicycle shop I patronize. I just found out that the first floor has always been retail of some kind. The performance hall was upstairs, half of which is now a dance studio and the rest is rented as artist’s studios.
Going left to the intersection with Main and crossing Merrit, we see the most popular scene depicted in the Plein Air Festival this summer, the Webster Block with it’s picturesque turret. The buildings were creating an effective wind tunnel but I really wanted to get this roll of film finished. The tripod legs were over the curb and lots of traffic went by during the exposure. This is really too far away for the thirty-five, but the other fronts were back in the car.. The view down Main and Church and the stoplight in the foreground really distinguish this one from my normal architectural schtick.
It wouldn’t be a test of the Variable Cuboid if I didn’t use a different front. I swapped to the 20mm which I’ve kind of been ignoring. I left it in the kitchen after cleaning up after dinner. This was a three hour exposure during which no human entered this room.
The next morning I got up when it was just getting light. I wanted to develop the film that morning so I could use the camera back that afternoon to finish the 100mm front. I went for an old standby, the mantle piece, recently outfitted for the post-Halloween autumn. The last few minutes before I closed the shutter, the sun came up and beamed in through the window.
Everything seems to work and I’ve already exposed two rolls of different color films with these new items and the rest of the components of the system.
The 35mm front has the .25mm pinhole that was formerly mounted in the risen position on the old 35. The 20mm has a .23mm pinhole.
Lomography Earl Grey 100 stand developed in Rodinal 1:100
If you are going to build one of these, you should review the 10th Anniversary Populist post for details on my methods. I’ll just repeat a few basic principles of cardboard camera craft here:
Roughen any glossy printed surface before gluing. The most common reason things come apart is a glossy surface that hasn’t gotten sufficiently roughened
Use enough, but not too much glue spread in a thin layer completely covering the surface you’re gluing. The other reason things separate is little gaps in the layer of glue.
Dry fit everything and rehearse clamping and gluing before applying wet glue. You don’t want to figure it out when it’s covered with wet glue.
If any corners or edges peel away or delaminate, reattach them right away with a bit of glue.
Keep a damp paper towel handy to clean your fingers and any stray glue.
Wait as long as necessary to let glue dry between steps. I won’t be repeating this at every step.
Supply list
A note on measurement: I’m going to mix metric and imperial units. The film format and length to the pinhole I always think of in metric terms and I use millimeters most of the time when I’m measuring. I’ll mostly use inches when referring to some product sizes. I’ll include metric equivalents, but I can’t be sure how they’re referred to in hardware stores outside the U.S.
A good supply of packaging cardboard or a similar weight poster board. You’ll need about two 24 can beverage cartons worth. The longest piece is about 432mm.
A 100mm x 200mm piece of 3/16 inch (5mm) foamcore, or equivalent thickness cardboard.
Several rubber bands that will go around the camera, but hold fairly tight.
About 125mm of 3/8 inch (10mm) dowel in oak or some other dense, strong wood.
160mm of 3/8 inch (10mm) dowel of any wood.
A small saw. I use the cheapest coping saw I could find.
Maybe a vice grips or some other vice like device for holding dowels for cutting. I made a couple really simple jigs to make this easier.
An empty 120 film reel
A pencil
A large black marker like a Sharpie.
Corrugated cardboard from typical shipping boxes. How much depends on how long your fronts are.
Flat black paint. I use Krylon spray paint.
Of course, you’ll need film in order to take pictures.
The film holder
The film holder is made of two parts, front and back.
Begin with the film holder back. Score and fold.
Clamp the flaps at the top and bottom.
One at a time, unclamp the flaps, apply glue and reclamp them,
Score and fold the film holder front.
Clamp together the front and back of the film holder. Make sure the counter holes are aligned and everything is square.
One at a time, unclamp the top and bottom, apply glue, reposition and reclamp.
Glue the templates for the film holder bases and film holder top on the foam core and trim them to size. If you had some corrugated cardboard that you could laminate together to make the equivalent depth, you might be able to use that, but I haven’t tried it. Cut out all the holes. If you haven’t cut foam core before, practice this a little. Use a sharp blade and multiple light strokes.
If you have a t-nut with a 3/8 inch shaft, engrave a few millimeters of foam out of the opening on the base top to inset the top flange of the t-nut. If it’s 5/16 in., engrave about 2/3’s of the first layer of foam to inset the t-nut, and if you have 1/4 in. shaft, cut out the whole first layer (before you glue them together). In these two latter cases, you’ll have to glue in little circles of card stock in a sufficient number to fill in the gap so the tripod screw doesn’t just push the nut up when you try to attach it. It’s important that that the t-nut extends two millimeters underneath the film holder. It has to go through four more layers of cardboard before it gets to your tripod screw.
Glue the two pieces of the base together with a few bits of dowel inserted into the outside holes to make sure they’re aligned. Once you’ve got your clamps on, remove the pieces of dowel so they don’t get glued in.
Cut the top and base of the film holder at the line. Mark the orientation of the pieces you’ve cut off so when they become part of film holder frame they’ll match exactly.
Notice I broke the edge of one of the holes when I made this cut. That will be all right when it gets glued together as long as there’s enough of the hole left to position the dowel.
Cut two pieces of 3/8 inch dowel 80mm long. Cover them with pencil graphite which will give them a slippery surface for the film backing paper to ride over.
Insert the t-nut and any layers to fill in the space in the top and press it in as far as it will go.
Insert the dowels through the top, film holder and base.
One at a time, remove the top and base, apply glue, reposition them on the dowels and clamp them.
With a bit of sandpaper, make the edge the film rides over a bit less sharp.
The film holder frame
Cut and fold the film gate and the film gate base. The base needs to be cut out of two layers of cardboard laminated together. Be careful cutting out that opening. It’s going to be the edge of every picture you make with this camera.
Glue them together making sure the openings align well.
Glue the template for the A and B flaps of the film holder frame aligned with the middle part of the template (it had to be in pieces in order to fit on letter/A4 size paper). This piece is going to be just under 430mm long. You can see that it crosses over some of the fold of the original carton. It will be OK when these two are glued together. If you have to make a splice to get a piece of card big enough, put it in the middle of one of the bottom pieces and hold it together with tape on the outside. It will be a little floppy, but will be solid when it’s glued together. After you cut it out, fold over and glue the sides to make a double layer to make the sides stiffer.
Lay the film holder on it’s back. Wrap the film holder frame around it with a bit of wax paper between them at the bottom where stray glue might glue them together. Glue and clamp the bottom of the film holder frame. Notice the corner where the template is peeling away a little. Glue those kind of things back down as soon as you see them.
When it’s dry, take them apart and remove the wax paper. Remember that the shaft of the t-nut is extending through the frame, so you’ll have to spread it slightly to get it apart.There may be bits of wax paper that stick that you’ll have to pick off.
Put them back together and again with the frame lying on it’s back, place the pieces of foam core you cut off the film holder top and base in place. This is one of those steps where it would be more trouble than it’s worth to get waxed paper between them to protect against stray glue sticking the parts together. In that case, as quickly as you can, carefully apply and spread the glue, apply the clamps, then remove the film holder. You’ll need 1 1/2 inch binder clips to clamp the bottom.
When dry, put it back together and glue and clamp the film gate in place. As soon as you get the clamps on, remove the film holder. Again, you’ll need binder clips to effectively clamp this.
The film axles and the winders
Now you’ll need to make the film axles and the winders. Both are essentially the same - a piece of 3/8 inch dowel with a tab cut into the end that inserts into the film reels. The film axles are a little shorter and go in the double layer of the film holder on the bottom. The winders go in the top, but need to be a little longer so you can grip them. I also glue a knob around them for something that’s easier to grip and provides a little torque.
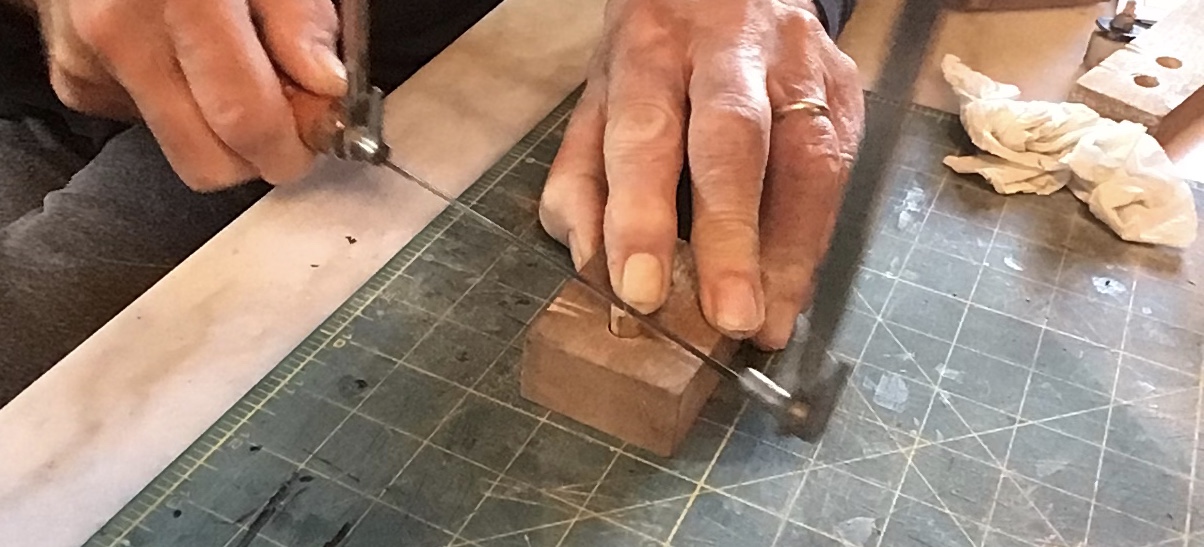
In order to make it easier to hold the dowels while making these cuts, I’ve made a couple simple jigs. For the winder, I need a piece 25mm and for the film axles 17mm. (If you’re not going to add a knob, make the winder a little longer, 30mm, so you can get a grip on it.) A piece of 5/4 inch board is almost exactly right for the winder, and a 3/4 inch board for the film axle.
I drill a hole completely through the board. I cut off the correct length holding the dowel against the table.
The second hole is drilled to the correct depth to leave the right amount for the tab sticking out. If the hole is too big and the dowel spins, put a bit of tape over the end to make it fit more tightly. If you’re using a pliers or vice to hold the dowel, mark a pencil line about 7mm from the end of the dowel. On the end of the dowel, eyeball the width of the tab and draw a pencil line. I try to be generous and then whittle the tab to the correct width later. Guiding the saw with a finger, cut down to the jig or to the line.
Then turn the jig or pliers and cut the tab. Be careful not to go too far and cut into the tab you’re trying to make.
Both shoulders should be even.
Whittle the tab to be narrow enough to fit into the slot of the film reel. I also round off the corners a bit to make it easier to find the slot in the reel.
It should insert all the way to the shoulder.
Before continuing, with a scrap piece of dowel, enlarge all the holes. Rotate it a few times to smooth the edges so it turns smoothly. If you’re using white foamcore, blacken the inside of the winder holes. Give the insides of the holes a coat of pencil graphite to lubricate them.
Put some 120 film reels in place in the film holder (One of them could be your fresh roll of film if necessary). Insert the film axles through the bottom of the film holder into the slots. Then insert the film holder into the film holder frame and insert the winder dowels making sure they’re seated in the slots of the film reel. Draw a pencil line around the dowel.
Make the winder collars from a double layer lamination of your card stock. When cutting out the winder collars, it’s best to cut the holes first and enlarge them with the piece of dowel and then cut out the collar.
Whittle a groove around the dowel to give the glue something to grab onto.
Place some glue around the groove and slide the winder collar onto the dowel from the bottom with the black side down. Insert it into the film reel to make sure it’s still right up against the frame, then remove it. Clean off any excess glue that may have squeezed out so it doesn’t dry into lumps.
These small dowels are a little hard to grip and don’t provide much torque. I prefer to glue them into some kind of knob. I like to use the cork wine stoppers with plastic cap that you find in olive oil and balsamic vinegar boutiques, but I have used a bit of regular wine cork. If you can drill perpendicular holes in the exact center of things, it would be pretty easy to make them out of a 10mm high disk of broom handle.
The camera back needs to slide between the winder collar and the winding knob.
First, cut off the cork as close to the cap as possible.
‘
Then, cut a vertical circle with the Xacto knife.
Cut and scrape out the cork so the dowel sticks in all the way to the plastic top. Remember, there needs to be a gap between it and the collar for the camera back to slide between. Crimp the dowel with a pliers or scratch some grooves into it for the glue to grab onto and glue it in.
Cut and fold the camera back. With the winders inserted slide the back between the winder knob and collars and form it around the film holder frame with some wax paper between them. One side at a time, glue the flaps down and clamp it all around with rubber bands. The flaps won’t come completely together. Try to get them square with an even gap.
Cut out the parts for the counter shutter.
It’s construction is detailed on the 10th Anniversary Populist post. Glue it together. Be careful applying and spreading the glue so you don’t glue the slider in place.
Glue it in place over the hole in the back of the camera. When you place the rubber bands on to clamp it, check that they haven’t pulled the shutter out of place. Adjust the rubber bands until they hold the shutter without moving it.
The camera front
The front supplied with the template is 55mm. To make it shorter or longer, cut or extend the top and bottom and the sides of the camera to the pinhole distance you want. I’m making a 35mm front so I’m cutting 20mm off as indicated on the pencil lines
I’m also making a 100mm front. When making a longer front, you would extend these sides to the length you wanted.
The shutter goes on the front. There are three options. The simplest is a single pinhole on the axis. The template for the single shutter is on any of the Populist templates. The shutter included on the template for the Variable Cuboid is a double shutter for over and under axial and rising pinholes. It’s made exactly like the single shutter, except the moving part is cut in half as on the Evil Cube.
It’s much easier to construct the shutter before folding and glueing the front into it’s final shape. Score and fold it before starting. Cut out the parts for the shutter. The parts that go against the front of the camera need to be blackened with a Sharpie as well as a border around the hole in the front. I have since changed the parts of the shutter to be longer on the bottom to provide for better overlap.
Glue the outside parts of the shutter together. It goes together just like my original single shutter, except the with the extensions out the side, and the flaps on the side of the shutter facing the body.
Insert the tabs through the camera front and the inside panel and fold them over as best you can. Be really careful with the glue here so it doesn’t get glued in place.
As soon as you’ve got the glue under the tabs, place something flat with a little weight on it.
Turn the camera front over and glue the single weight shutter guides under the shutter extensions.
Glue on the double thickness middle layer of the shutter guides which define the limits of movement of the shutter.
Glue on the double layer top shutter guides which hold the shutter on and keep everything tightly up against the camera body.
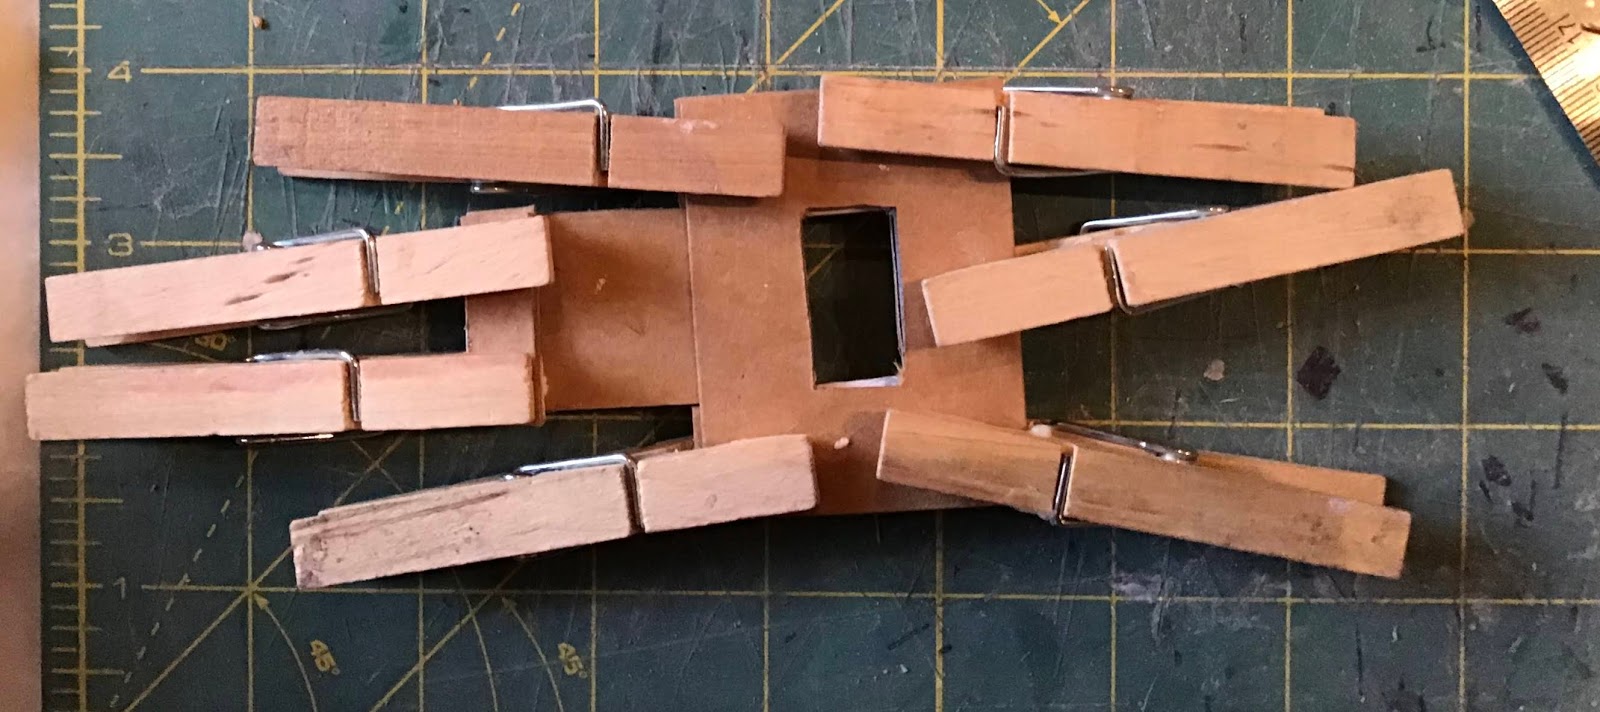
I forgot to take a picture of this earlier, but these parts can be clamped with clothespins if you fold the side flap all the way over.
Cut four pieces of corrugated cardboard the width of the side flap and 10mm shorter than the pinhole distance of your front. Make these pieces oriented so that the end where the internal corrugations are visible will be facing out when the front is glued together.
These corrugated cardboard parts and two more that will be added to the top and bottom later on have several functions. They make the sides stiff. This isn’t a problem with short cameras, but with long ones these sides can be clumsily floppy. They also form a stop so the front goes onto the camera back straight and at exactly the right distance.
Corrugated cardboard is preferable for these for two reasons. The foam in foam core is soluble in spray paint, paper isn’t. Once painted black the open tubes formed by the corrugation is a nearly perfect black hole to catch any any stray photons that make it down the light trap.
Glue them into two double layer pieces. Glue them to the flaps so they will be right up against the front when it’s folded together.
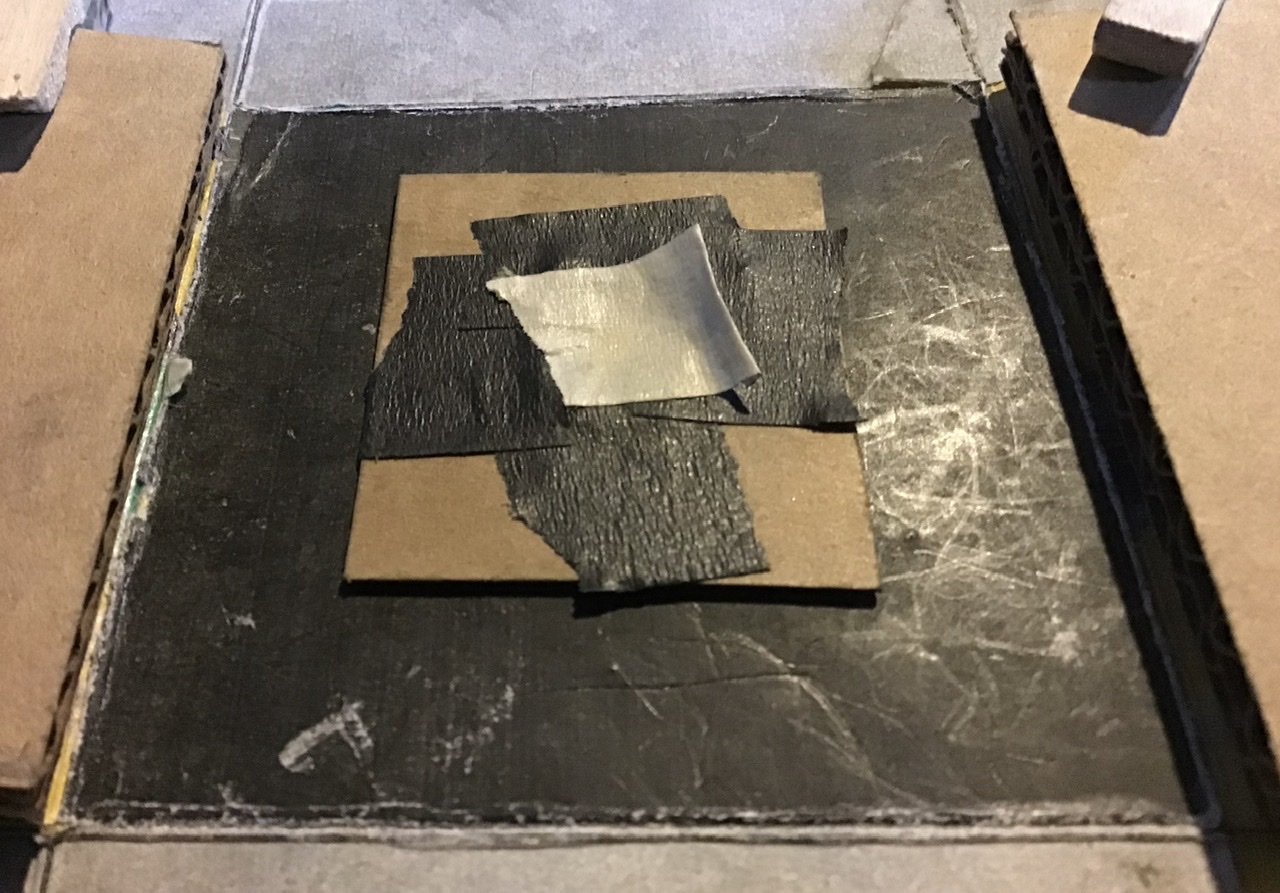
If like me you can’t get your hands inside of one of these things, install the pinhole before continuing. Since you’re going to paint the inside of this thing, mask it with a piece of tape, maybe with a little folded over handle so you can get ahold of it to remove it. DANGER! WARNING! Remember to remove this piece of tape before trying to take pictures. I did this recently and read on Facebook about someone else making the same mistake.
If you’ve chosen the option to have one or two pinholes fixed into place, you can make a pinhole mount. Make a strip of cardstock the width of the eventual opening, long enough that it can be folded to match the front of the camera with sides long enough for you to put it down against the front and tape it in place. With it inserted into the camera, trace the openings through the front of the camera. It has to be completely blackened too. Then you can install the pinholes with it after all the painting is done, and easily change them if you need to.
Now fold the front over the film holder and back so that the cardboard stops hold it at the right distance. The flaps probably won’t come right together, but try to keep them square. This can be a little tricky to do. You can hold the front against the back with a rubber band that’s just strong enough to hold it in place. Another option is to tape it to the back at the top and bottom. Note that there may be a little gap between the front and the back. (BTW, I’m going to alternate between pictures of the 35mm and the 100mm front)
Glue the flaps. As soon as you have, clamp the front with a rubber band and remove it from the back and clamp the sides.
Now cut the corrugated cardboard stops for the top and bottom so they just fit between the ones on the sides. Since the panel inside the moving shutter has to travel all the way to the top of the box, I’m making the top one 10mm shorter so there’s a gap for it to move in. I’ll have to be careful to align it with the others in the back. Glue them in place.
The light trap.
The light trap is made from a strip of your card-stock about 430mm long, - long enough to go around it with a double layer at the bottom. With shorter cameras I have sides that extends all the way to the front but that may be problematic with a longer camera. (Although I just did it with the 100mm front. That really makes a strong box.) The light trap goes all the way back to the winders and needs to have enough overlap of the front to give you a good gluing surface, about 25mm. As with the film holder frame, if you have to make splices, make them in the double layer at the bottom. It’s important that the the light trap fit tightly around the back. Form this around the back as tightly as possible. So you’ll have square corners, after you form it around the front, starting at the top corners, give them a good sharp crease, and then reform the bottom corners if they’ve moved and give them a good crease.
Starting with the top, apply glue to the front in a thin layer being very careful not to extend it over the edge so you glue the front and back together. As you get each side done, hold it against the table and keep it in place with one hand while you finish the other sides. As soon as you get done, clamp around it with rubber bands near the front to keep everything in place, remove it from the back and clamp it.
The moving shutter will probably be loose enough that you can’t open the shutter without pulling it up. Cut a piece of card stock exactly the width of the shutter about 10mm deep. Blacken it on one side. Apply a thin layer of glue and slide it behind the shutter with the black side facing the camera body and glue facing the shutter. That will probably make it tight enough to stay in place when you open the shutter, but it may require a second one of these.
Viewfinders
Viewfinding is done with sighting triangles made from double layer card stock, 60mm at the base and as long as your pinhole to film distance. Glue them on with the point aligned with the pinhole and the base parallel to the front. Note that on the sides, the pinhole and the image plane will be 5mm above center. If you’re using two pinholes insert beaded pins in the front and indicate the location of the film plane with a card stock line. If using the adjustable rising front, insert the beads in the sliding part of the shutter.
Light proofing
Because I’m a little concerned about it getting sticky and dissolving the foam core layers, I just blacken the film holder and the film holder frame with a sharpie. The only place opaqueness is an issue is on the sides of the film counter chamber where there’s only one layer of cardboard between it and the film. It’s only exposed to light when advancing the film and you should be doing that in subdued light, but be particularly liberal with the Sharpie on the side that faces the film.
The light trap will extend over the back to the winders. Blacken that area of the back with a Sharpie.
The inside of the front and back of the camera should be painted with 2 or 3 good coats of flat black spray paint.
Since you’ve been so patient reading this extremely long post, I’ll let you sit back and watch a video on how to load it.
In the video, I forgot to put a rubber band around the camera after I put the front on. It’s liable to fall off and expose your film if you don’t use one.
If you see any errors or easier ways to do something, have any questions or any comment in general, please let me know.
If you make one of these, I’d love to see pictures of it and the pictures you take with it to feature here at Pinholica.