

The next project with the double-sided adhesive and the self-adhesive labels was the big guy, the 4x5 Pinhole Lab Camera, with the latest corrections to the template. This camera is supposed to be all about learning and it did not disappoint.
It has slots in the interior so you can change the angle of view and the pinholes - under light-safe conditions for your light-sensitive material i.e. a darkroom or a changing bag. It has three pinholes for rising and falling front capabilities in both the horizontal and vertical orientations.

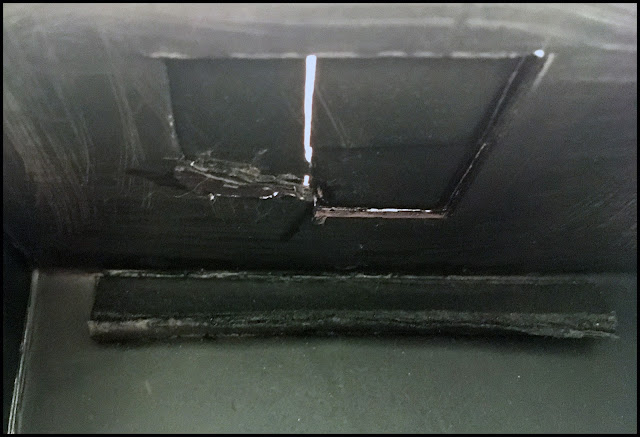
The main change was to the shutter. In the last iteration, at the shortest distance to pinhole, the shutter got in the way of the edges of the image. I changed the distance between the pinholes from 15mm to 20mm and enlarged the openings. As you'll see below, that seems to have worked. Notice how wonderfully straight that new shutter is on the box.

I made two near-fatal mistakes in making it. Cutting out the top box, instead of cutting between the side and the side flap, I almost cut off the flap. I caught myself before it was completely severed. I repaired it with three layers of opaque tape and proceeded normally. It left an unsightly gap in the corner so I glued in a narrow strip of card to fill it.

When I made the top, with it formed over the bottom for the best fit, I was so focused on that damaged corner, I didn't notice that the holes for the pinholes were on opposite sides. No big deal, right? When I just opened it and reversed the top, I discovered that it was very slightly trapezoidal and the outside front was just a smidge narrower than the bottom. It would slide over it but it caused the inside to bow in, including moving the pinholes farther back. I cut a narrow triangle out of the front of the inside box so it fit correctly without distorting it.

All the struggling to figure this out didn't do any good to the front of the inside box, and it would still bow in more than I wanted. I glued in a wedge at the top of the outside box so it would force the front of the inside up against the outside. The inside corner of the front opening kept catching on the bottom and had to be cut off.


It has no tripod mount since it's intended to be used in any orientation and unscrewing it from the tripod every time to reload would be a hassle. I had been attaching the camera to a platform on the tripod with rubber bands. As you know if you ever shot one across a classroom, they can get away from you, possibly damage the camera and even accidentally open the shutter. On one of our Halloween hunting adventures, I bought some Velcro fastener straps. With a strip of that held to the platform by the quick-release adapter (one of these days I should staple it on), I could quickly and firmly-enough mount the camera on the tripod. It doesn't block my view of the viewfinders. That was a real improvement over the rubber bands.

To contain my paper, I've been using this box from letter sized Photo Mechanical Transfer receiver paper which I've painted with numerous coats of black Krylon on the inside. I kept losing track of the pinhole mounts in the changing bag, so I taped an envelope on top the box for them.

I put the sheets of paper in some old envelopes to protect them a bit, with the emulsion side always facing up. I have a sheet of black cardstock just smaller than the box inside. Fresh sheets are on top, exposed are on the bottom.

It turns out it's kind of a tight fit in the changing bag.
Unbelievably overconfident, I set off to try it out at the County Park. Changing the paper, image plane and pinholes seemed to work pretty well. When they were developed, except for one, they were all very fogged!! After my experience with Little Guiness, I immediately suspected this cardstock to be less opaque. In kind of a knee-jerk reaction, I painted the inside with about six coats of flat black Krylon, After a few tests at home including a full day in the sun, it looked like the light-tightness of this camera could be trusted.

Out to the County Park again, and yet again most of the images were fogged to some extent! I now realize that while wiggling around inside the changing bag, the sleeves kind of drooped down to my elbows and allowed some light in to ruin my negatives. I kind of became aware of this in that second field test. I did some more exposures at home changing in the darkroom and those support my hypothesis,
I'm going to make a paper safe out of foamcore just big enough to hold my envelopes and Sarah has said she will help me make the sleeves elastic so they stay put on my biceps. Another realization was that the times I've had no trouble in the changing bag, I had a winter coat on which fits more tightly in the sleeve. Maybe just wait til winter.
So, other than all that drama, how's it work? Keep in mind this also required a lot of relearning about the response of paper. They're also developed in Caffenol so couldn't exactly be developed by inspection.
From the first outing in the County Park.
At an inch an a half, the latest version of a playground merry-go-round. It's alway odd to see these ultra-wide angle images when you know where the camera actually was. I don't think I was two feet away from it. This is with the on-axis pinhole. Looks like the whole image area is lit up.

From the tests around the house.
At one and a half inches, on-axis at my new computer.


No comments:
Post a Comment