In April 2014 there was a total lunar eclipse in the wee hours of the morning. I couldn't bring myself to stay up all night to see it. I just put The Populist out after dark and before twilight began the next morning, closed the shutter. I never saw the eclipse at all.
That night Mars was shining at magnitude -1.4 and pretty near opposition so it also passed all the way through the scene during the night. In the full frame you can just barely see it. It's easier to see in a close up detail.
This image is also notable because even in eclipse, the moon was bright enough to be recorded and the reddening is clearly visible. The extremely overexposed full moon trail on the little 35mm negative shining through the pines also makes for a dramatic image.
Encouraged by my success in April, I tried again later that year in October. This time the moon set while it was still in eclipse.
A year later at the end of September there was another total lunar eclipse that began not long after moonrise. I decided to go over and sit in Menomonie Park to watch it. I thought maybe I could get a reflection of the trail in Lake Winnebago. The eclipse was just beginning its partial phase before the sky was dark enough to open the shutter
Duh! Angle of incidence equals angle of reflection. After the moon rose a bit, the reflection was no longer bouncing back to my position on the lake shore. This is a fairly severe crop of The Populist's 35mm negative which really emphasizes the overexposed full moon trail. The film was Walgreen's 400 film so it was even more blown out than the earlier moon tracks done with the 200. The red color of the lower lobe is curious. I would ascribe it to haze and light clouds but it doesn't look like that in other pictures done that night.
I also had the 6x6cm Glenmorangie Evil Cube to see what it looked like with a larger negative.
This was with Portra 160, slower than the film in the Populist and it's about a stop slower camera. So the trail is less extreme and there's just a bit of a glow reflecting in the lake. Without the overexposure of the moon's reflection near the opposite shore, it captured a few lights over in Calumet County.
I had my 10x50 binoculars along to entertain myself during the long event. I took advantage of the darker skies and just scanned around the sky. A notable memory was my accidental discovery of Uranus just few degrees from the moon (verified by Sky Safari). It's hard to believe no one noticed this kind of odd fuzzy green star moving around before William Herschel.
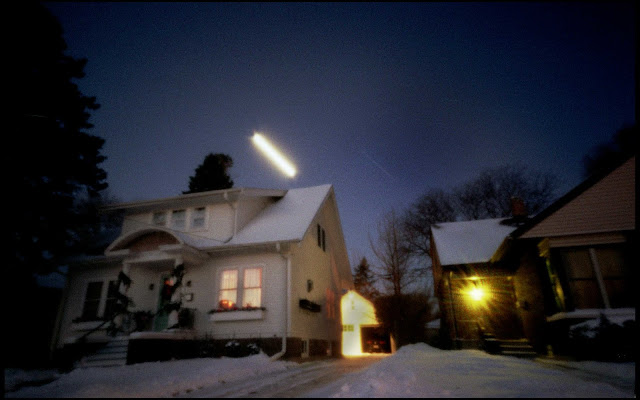
This next image is not an eclipse, but again referencing Janet's post on Facebook, I was shoveling snow one morning before dawn with the moon and an extremely bright Jupiter setting in the west. It was also near opposition, shining at -2.5. As usual The Populist was in my pocket. I set it on the big pile of snow next to the driveway and opened the shutter while I finished shoveling. In addition to the moon trail, I also picked up the trail of the giant planet.
Twilight was beginning so although it was brighter than Mars during the eclipse, it's not much clearer in the whole negative but you can see it in a full resolution detail. The beginning of the moon trail looks like it might be the shape of a waxing crescent but it had to be full to be setting just before dawn and I can't really explain why it looks like that.
I wasn't the first one to do a lunar eclipse pinhole photo. In 2007, on f295, a participant with the nom-de-internet Monophoto posted a lunar eclipse image. A year later, Gregg Kemp posted a picture of an eclipse in his gallery of landscapes with moon trails. Working on this post, I also found a gallery of Lunargraphy by Csaba Kovacs.
These weren't my first experiments with pinholing the moon. On the Pinhole Visions forum, therefore prior to 2004, there was an occasional special assignment topic. The theme for one of these was "motion" and I remember thinking it would be cool to do it on the largest scale possible. With a 4x5 camera and photographic paper I did an all night shot of the moon rising over the house. I no longer have that image, but a decade or so later, I recreated it with The Populist, this time adding interest with a Mustang in the foreground.
The current prediction for the weather next Sunday is mostly sunny so I may get another chance at a total lunar eclipse. (Although it hasn't been clear for more than an hour or two since mid-December.) Winter in Wisconsin is usually a pretty good time for pinhole lunargraphy. The sky will be completely dark by 7 PM and stays that way until at least 6 AM, even facing east toward the rising sun. At mid-eclipse the moon will be almost due south and quite high in the sky. Venus rises at 3:54 AM at magnitude -4.4 and Jupiter at magnitude -1.8 rises at 4:40 AM so they might be at least partially within the angle of view as well by the time I have to wake up and close the shutter.
Later edit.
I made three images of that eclipse in 2019
A stereo image with a 60mm long camera with two 6x6cm image chambers. (Set up for crossed eyes)🧐
A panoramic image with two side by side 35mm Populists pointed in slightly different directions.
And one with a wide angle 30mm pinhole to film camera on a 6x6 frame.
In 2020, I finished Worldwide Pinhole Photography Day with an exposure of the crescent moon and Venus setting in the West.


