Saturday, March 27, 2021

Power

When I taught photography, in order to emphasize the importance of the individual point of view, I gave one assignment that was a vague concept that would have to be interpreted by the students. One semester it was "Power." I don't remember much about the photographs they turned in. On my bicycle rides around the city I occasionally see some bit of infrastructure of the electrical grid and think of that assignment.

I specifically chose this overcast weather to pursue this exercise. I knew the locations where I wanted to take the photographs but I didn't want to be limited by the direction of the sun. The clouds also provide some relief from a plain sky.

I left the house with the 35mm front mounted on The Variable Cuboid. My first destination was the Bowen Street Substation on the east side of town. When I got there and looked at it, I had to include those two dominating vertical poles. It was too close to the busy street so I needed to photograph it from the other side. I discovered that I had left the 60mm front at home and the 100mm was too long, so I used the 45mm front.


It wasn't that out of my way, so I stopped at home, found the 60mm front and headed to my next subject, the historically named Oshkosh Substation downtown next to the river. I put on the 100mm, held it right up against the fence and aimed through a link.


The Pearl Avenue Substation at the University. I had scouted around it in the past so I already knew which side I was going to photograph. There's a telephone pole roughly in the way in this direction and I thought it might limit my options. I put the 35mm on. I was surprised that the picture as I wanted it was well in front of the obstacle.


The Sunset Point Substation. It's right next to an overpass on the highway so I could get a bit above it and use the axial pinhole. I switched to the 60mm.


A 138 kV transmission line along the Highway 41 causeway. It's part of a major north/south route connecting The Fox Cities and Fond du Lac. I had already figured out that the most dramatic way to illustrate a line of power towers was to concentrate on the closest one and make sure you get at least one other behind it. Also my position on the overpass gave me an advantageous angle. I was a little concerned because I had to point the camera directly into the sun. It seems to have worked in a day-for-night kind of way.


A 345 kV line runs north and south about 10 miles west of town and is connected to the city by this 138 kV line. It goes through the part of the city known as Westhaven. The city limit was at Highway 41 in the 50s when the highway was routed that way. Now the city limit is over a mile and a half west. This is about the west edge of town. The line goes over Fox Fire Drive through a rather broad right of way with suburbia on either side.


A lot of the route takes advantage of the parkland of the flood plain of Sawyer Creek to stay out of anyone's back yard.


In the earliest west side neighborhoods, the towers can seem quite close and menacing overhead. The 60mm was too wide for this so I changed to the 100mm sitting on the curb at the intersection of two quiet residential streets. No sooner did I get my arms in the changing bag when people started appearing. As I was lining up the camera, a woman, probably about my age, came from behind me and asked me what I was doing. I told her I was taking a pinhole photograph.

"Of what?”

"Of the transmission tower among the houses." I said.

She said she just asked because it was her house and it seemed strange. I explained I usually avoid people's homes but thought just the roofline would be OK. I gave her my card. I agreed it was strange. 

She repeated that she thought it was strange.


The line eventually reaches the Ellinwood Substation next to the Highway. There’s a clear view and a big lawn next to the road, but the angle that I thought best was behind a line of dried cattails that I had to squeeze through. It's surrounded by a little ditch. I changed to the 45mm.


A 69 kV line connects to it from the east side of the highway on Osborn Avenue. I was taking advantage of another high viewpoint at the top of the berm around the Viking Quarry. I had the 100mm front on and was backed right up against the fence on a steep slope so I couldn’t see what I was doing very well. I was also afraid of falling in view of what was moderate traffic. I neglected to pull the shutter out all the way and obscured the top half of the negative. I first got this idea of power distribution looking at this scene while doing the Truck post with the Manic Expression Cube, so to honor that moment, here’s a 24mm detail from the of the bottom of this negative.


The line goes to the 12th Street Substation, surrounded by another nice little neighborhood from the 30s and 40s. I had a clear view from across the street with the 100mm, but it just looked more interesting with a wide angle of view. I sat down on the curb in front of a line of pines across from it and changed to the 45mm. This time, just as I had popped off the front, a guy about my age and his little dog came up behind me from the left. I couldn’t pull my hands out. He asked me if I was OK. I had to explain myself. I joked that he probably hadn’t seen someone use a changing bag before. I was a photographer and the way I did it, I had to sometimes prepare in the dark, hence the changing bag. At about that point I got the new front on and pulled my hands out. I said I was a crazy photographer who liked to take pictures of Oshkosh and maybe tell a story.  

“And today it’s substations” he said. “I just asked because this is my house.”


This is a regular city distribution line across the river at the location of one of my eight little bridges from January. 


Before I left the house, I had made a list of what I was going to photograph and the most efficient path to get from one to the other, although slightly out of order. It was about a 20 mile ride. I followed the plan until almost the end. When I had gone by it on the other side of the river earlier, I decided my last idea wasn’t that interesting and had seen a couple better prospects as I rode down the shore. This alternative last photo also cut a few miles off the path home.

Kind of odd, after years of cursing powerlines, that I'm going out of my way to preserve them in these images.

Done with the 6x6cm format Variable Cuboid with Ilford Delta 100 semi-stand developed in Rodinal 1:100


Tuesday, March 16, 2021

North Main Street

Of the four streets that cross the river in Oshkosh the only one with the same name on both sides is Main Street.  It's where the first bridge across the Fox was built and was part of the main commercial route from Milwaukee to Green Bay until the 1950’s. I live a block west, on the north side on the 1500 block.

I avoid Main Street on my bicycle but I drive down it a couple times a month. A few times a year I end up walking that way, going downtown to pick up or drop off a bicycle.

I don’t intend this to be representative of North Main Street. I just picked the things I thought would make interesting photographs.


Beck’s Meats has been a butcher shop since some time mid-century, but this family has only run it since 1996. This isn’t the only business in town with a sign specifying ho-made products.


It’s been a while since anyone used one of those dot-matrix banner-making programs so this business has been here for some time. I’m pretty sure the sign is supposed to say Custom Wood Fabrication. Most of the samples are wood containers but I think I’ve seen a banjo and a cello case in there. I wonder if they could make the Evil Cube out of wood?


In beforetimes, lunch at Pilora’s was our most common outing to a restaurant. 


Ju’s is a tailor and dry cleaner operated by one woman, in her home, for thirty-six years.


Becker’s Music focuses on sheet music and rental of band instruments although they usually have about three electric guitars in stock.


After taking the picture of Becker’s, I put the camera in my backpack and collapsed the tripod and attached it to the bike rack. I then looked up and decided Crosby’s Dance Studio had some visual interest and had to immediately reverse the process.


I’ve been trying not to say that parts of North Main look pretty bleak. It’s hard to miss on the east side of the 600 block. There’s two bars on the north corner and a Burger King and a sports bar on the south, but in between it’s pretty empty. This building was a tire store and auto repair until just after the pandemic started. I bought a tail lamp bulb for our Taurus here in the 90s. Just before everything shut down, I was going to take a photograph here because they had a Studebaker Silver Hawk parked in their lot and were selling a 1973 Beetle exactly like my first new car but I never got around to it.


The west side of that block is pretty busy. This is the lot for the new UHaul depot behind a household rental and gun store, protected by a row of alternating yellow and black bollards. There are quite a few parking lots downtown.


During the heyday of wood manufacturing, Oshkosh was a pretty big deal place, the second biggest city in the state. All those parking lots were full of buildings, many of them huge William Waters’ romanesque monuments like the Post Office, City Hall, The Athearn Hotel and the Courthouse. It must have had a bigger city look then.

The Mello Ice Cream Company Building is one of the survivors. It wasn’t built until 1931. It’s gone through a succession of quirky little shops and is now a Yoga Studio. For a few years there was new age gift shop in there. The owner used to organize drum circles during the Farmers’ Market, held in the street on this block and the next.


The Oshkosh Saturday Farmers’ Market Headquarters is in an old used car lot. 


The Raulf Hotel was a pretty posh place in the 30s through the 70s. Now it’s owned by the Oshkosh Public Housing Authority. The first floor retail space includes a fancy dog groomer which gives it a bit of class.


The Oshkosh Convention and Visitor Center is across the street from the Convention Center itself. I used to go in there to get state and city maps to keep in the car.


With the 35, 45 and 100mm fronts on the 6x6cm Variable Cuboid. Ilford Delta 100 semi-stand developed in Rodinal 1:100. 


Wednesday, March 10, 2021

Sun and Shadows

I like to come up with a project or theme so I can just follow a list rather than waiting around until I see something to photograph. Last week I couldn’t come up with any coherent idea so I loaded the Variable Cuboid and hoped I would find inspiration.

Famous YouTube star Joe Van Cleave has commented several times about his admiration of my consistency and I haven’t quite figured out what he means by that. From my point of view, I’m all over the place jumping from one subject to another, mixing angles of view, color and monochrome and formats ranging from 35mm to 4x5 inch negatives. I read an article by a gallery curator recently that said it helps to have a portfolio with a consistent theme in order to get your work exhibited. I’ve never been able to do that. Many of my favorite photographers such as Cunningham, Weston and Steichen jumped from portraiture, architecture, landscape and abstracts. They all had a pretty recognizable style no matter what genre they were working in. Maybe that’s what he means. Do I have a recognizable style?

The temperatures have gotten quite moderate and we’ve had an extended period of sunshine, so I could go out on my bicycle with the camera and see if anything interesting appeared before me. I’m not sure if I had anything to do with it but a theme of sunshine and shadows seemed to develop, that I became aware of about two-thirds of the way through the roll.

I started with the 35mm front. Before I even had a chance to go out, the early morning sunbeams highlighted these faux-topiary pieces on the mantle piece.


Shortly thereafter, it fell on the shelf containing half of the books featured in my festival of reading.


Upstairs, the sunbeam fell on the end of the towel rack. Got a little overexposed.


Out on my bicycle,  I passed the all-black, back wall of The Dollar Store with red bollards protecting the door and metal grids over the windows.


A uniform grey loading dock.


A few days later, I put the 100mm front on and went out after a few scenes I had been waiting to get all winter. A front corner of Merrill Middle School.


The big lecture room wing of Sage Hall has a green roof. This spiral staircase is the only way to get up there.


The stairwell in the back of Merrill Elementary School which connects to the 1970’s addition.


There was a discussion about nudes in the Photography Books and Theory group on Facebook and this came to mind while looking at a sunbeam on the floor of the bathroom. I had changed back to the 35mm front. I always have to relearn the lesson that the shutter also can cast a shadow during the exposure.


Back to the 100mm front. One of the brackets which hold up the mantle piece. I’m pretty sure there’s not supposed to be a face on it.


I never wear shoes around the house. They most often constitute a hazard to navigation wherever I’ve left them. Can this be classified as a footograph?


The bundle of the Hobbit and the Lord of the Rings trilogy which Sarah bought in 1972. They’ve been read by both of us at least once a decade including reading the entire series aloud to Andy at bedtime. You can lose your voice trying to talk like a troll or an orc.


The Variable Cuboid makes 6x6cm negatives.  The film was my first roll ever of Ilford Delta 100, semi-stand developed in Rodinal 1:100.


Thursday, March 4, 2021

Building the Pinhole Lab Camera.

For the ideas behind this camera, a description of its capabilities and examples of its use, please see the links below

The Evolution of the Pinhole Lab Camera

Field test of the Pinhole Lab Camera with revised shutter

 Playing with pinhole panoramas with a parabolic image plane

A 4x5 Pinhole Lab Camera

 Ultrawide good news and bad news

Before starting to build one, if you’re not familiar with my methods, take a look at 10th Anniversary Populist Plans for the basics of building cameras from cardboard.

There are two templates for the Pinhole Lab Camera. One makes negatives an eighth of a standard sheet of photographic paper, (2.5 x4 inches, 64x101m), the other a quarter sheet of paper (4x5 inches, 102x127mm). Here is the link to the templates 
Four parts of the template for the 4x5 camera
    assembled in alignment

The material for making the camera is the sort of cardboard from cereal boxes or cartons of beverage cans. It has to be something that will fold. Remember to roughen any glossy surfaces that will be glued.

Some of the parts require double weight stock made by laminating two layers of your cardboard together. The guides for the various positions of the image plane require three layers laminated together. If you happen to have some matte board which is the same thickness as double or triple layers of cardboard, feel free to use that. They don’t have to fold. 

For the largest parts of the 2.5x4 inch camera you’ll need pieces of card stock about 10 x12 inches (254x304mm), for the 4x5 camera, 14 x15 inches (356x381mm).

I’ve set up both of them to print on U.S. Letter paper which should fit on A4 as well. (Make sure to print at 100% and not fit to print) This required the top and bottom boxes of the camera to print on multiple sheets of paper. The templates need to be assembled in alignment when glued to the cardstock as illustrated to the right. With the 2.5x4 camera two pieces make up the top and bottom and with the 4x5 camera, four. The edges which go together are labeled with letters. 

The pictures below were done making several different cameras.

Start by cutting and folding the bottom box.

Before gluing, cut out the opening for the pinholes.

One at a time, glue the sides. Make sure they are straight and the inside flaps meet in the center and clamp them.

Your clamps will probably not reach all the way to the bottom of the box, particularly with the 4x5 camera. Use a piece of double weight card stock slightly wider than the camera to hold the bottom of the sides tightly together while the glue dries.


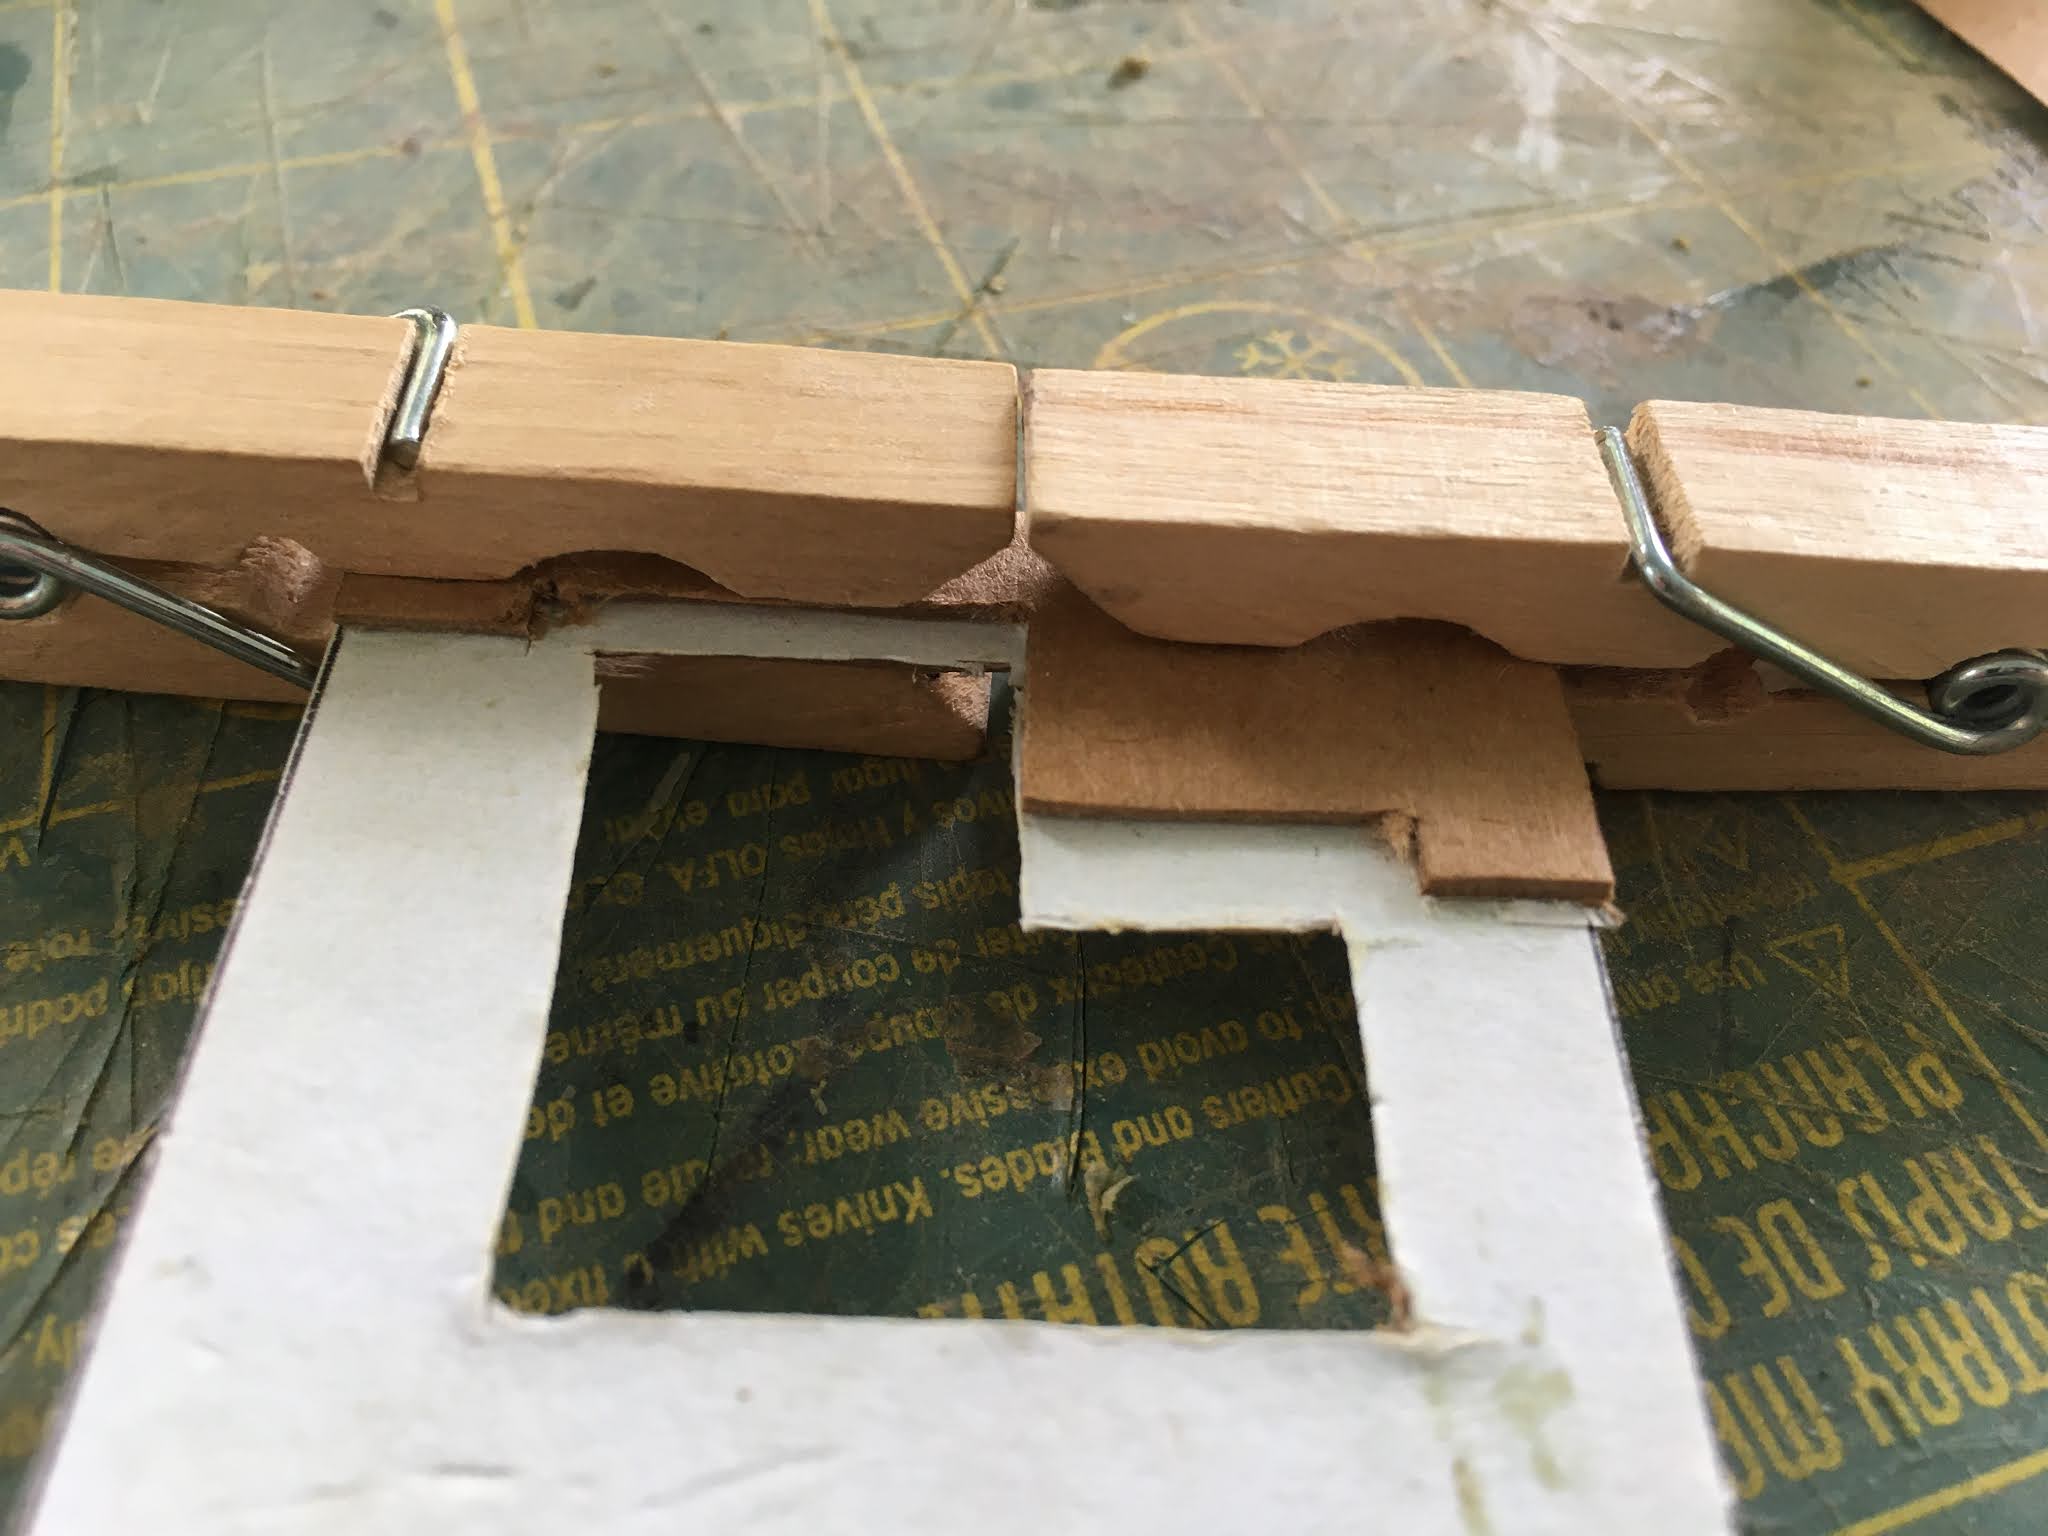
Cut out the Pinhole Mounts and the Image Plane.

Cut out the Image Plane Guides and round off the tops which will make it easier to insert the Image Plane in the slot under safelight or in the changing bag. Make one pair slightly too wide so that if the fit isn’t perfect, you will have extra width or you can trim it to make the fit exact. It might be worth while to clamp them in to check the fit. The slots should be just wider than the Image Plane and the Pinhole Mounts. You want them to slide into the slots easily but not so it’s floppy. Especially the front slot the Pinhole Mount goes in should hold it tightly against the front of the camera.


Starting in the front (I know, this picture shows me starting in the back - that turned out to be a mistake), place the Pinhole Mount in place and glue the first set of guides to the sides. Make sure the guides remain parallel to each other.


Once again, the clamps probably won’t hold the entire guide tightly against the side so you will need to use a piece of double weight stock to secure the bottom.


Allow it to dry long enough that it won’t shift. Then place the image plane against that set of guides and glue in the next set of guides and repeat. The last set of guides may have to be trimmed to hold the image plane against the back of the camera.

After these are all dry, place the Image Plane and the Pinhole Mounts in the inside slots to make the bottom box more solid and fold and glue the top over it. You might want to put a layer of waxed paper between them to prevent stray glue from sticking them together. Clamp with rubber bands.

If the openings for the pinhole don’t match exactly or don’t match the openings on the pinhole mounts, trim them to match.

You’ll need three identically sized pinholes for each Pinhole Mount you’ll be using. Tape them on the front of the Mounts (the side facing the box). Make sure you don’t cover one pinhole while mounting another. Try to get them as close to the center of each segment of the opening as you can. Cover any gaps.


The shutter consists of a cover, two sliders, one of which is cut in half for the over and under pinholes and separate guides for the top and bottom which was necessary to have sliders come out both sides.


In order to make it as thin as possible so it wouldn’t block part of the image in the widest angle view, it only has two layers which makes it a little tricky to assemble.

Start by gluing the top guide onto the front.


Then clamp the sliders onto the cover and glue the lower guide. (Don’t forget to cut the double side in half.)


Then, on the outside of the shutter, tape the sliders to the front of the shutter to hold them in place and glue the shutter on the front of the camera. Make sure the openings are aligned with the opening on the box. When you clamp the shutter with rubber bands, make sure it doesn’t move. Adjust the rubber bands so it stays aligned with the holes.


Glue a few layers of card at the ends of the sliders that protrude out of the shutter to give you something to hold on to when opening them. Place them so that when the shutters are closed they prevent the slider from pushing open the shutter on the other side.


You may have to adjust the mounting of the pinholes so they’re centered in the opening when the shutter is opened.

The camera of course needs to be light proof. I’ve included a part on the pattern to glue an extra layer on the top and bottom. These could go on the inside if you’re making the camera featuring the packaging design on the outside. The other sides already have a double layer.

Make some marks on the edges of the camera at the locations of the pinholes and at the location of the image planes for viewfinding. I glued some little circles of double weight cardboard to give a little bit of relief which makes it easier to line them up when framing your picture.


The camera has to be loaded and the the Pinhole Mounts and the location of Image Plane changed under safelight conditions, or in a changing bag. The paper is held in place with a few doubled over pieces of tape. I found it easier to tape the paper to the Image Plane and then insert it into the camera. To accommodate not-quite-accurately cut paper, the camera is slightly wider than the negative size, and there is also a bit of extra room at the top. Place the paper centered on the film plane and aligned with the bottom.


I found it kind of a pain to do this in the changing bag, so I made a rudimentary film holder by gluing two narrow guides on the sides of the Image Plane.


And then cut a part with sides just slightly narrower, connected across the top, so I could just slide the paper in and it would stay in place.


I’ve also used this for 4x5 sheets of film, but be aware that 4x5 film is slightly narrower than 4x5 sheets of paper.

When using curved sheets of paper, I found it helpful to glue an additional ridge on the guides where the edges of the paper come to make sure I had it centered with a uniform curve.


It’s a good idea when the camera is loaded to use some rubber bands to immobilize the shutters and move them just before making the exposure.

Please let me know if there are any questions or comments.  If you make and use one of these cameras, I would love to feature your work here at Pinholica.