Thursday, June 21, 2018

Museum Volunteer: Photographic Technology and Equipment.

After a year and a quarter of photographing all sorts of stone tools and arrowheads, I finally made it through the backlog and have graduated to cataloging the Oshkosh Public Museum's collection of Photographic Technology and Equipment (That's the official museology category for standard naming of objects.)

I studied the basic textbook of museum cataloging before beginning. Right out of college, I worked in a library cataloging department that included lots of audio-visual and realia. I worked with some of the first library computer catalogs, and I've been involved with all sorts of databases and catalogs, so a lot of it was familiar.


The artifacts not on display are in compact shelves in the Carriage House behind the museum, which is completely rebuilt inside to be a storage and exhibit preparation facility.


Most of the objects are stored in boxes, and I normally bring up one box at a time.  The photographic objects have only been briefly accessioned and given a catalog record with a description by someone who didn't know much about photography.

The first box I got had a 4x5 RB Graflex Series D in it.  It belonged to the Oshkosh Police Department from about 1930 when it was new and was in use into the fifties.  It included a special back to place two images on a 4x5 sheet of film which was used for mug shots. It had been described as a split image camera.  In another box was an actual split-image-only camera custom-made by the Wisconsin State Crime Lab with the front of an Ansco Pioneer and the body of a battleship that had been listed as a part of the Graflex.


This Graflex was the top-end SLR of the thirties and forties. Edward Weston used an earlier model to make his 4x5 nudes.  When pursuing similar work when I was younger and wishing for a larger negative, I remember thinking it would really be great to have one. It would be cool to take pictures with this stuff, but museum protocol says you handle objects as little as possible.  This one's in pretty bad shape anyway, and the only film holder with it was a film pack adapter.  They stopped making large format film packs in the eighties.


The protocol also says every part must be marked with it's accession number in as inconspicuous a place as possible if there's any likelyhood that the pieces might be separated. My second box had a folding Blair 5x8 view camera from 1895. The back came off to rotate and it had another film pack adapter loaded in the back, both of which had to be marked. It was a 5x7 film pack adapter, however,  and when it was inserted, there was a quarter inch open slot in the back of the camera. Not very light-tight. Labeling involves using three layers of a dissolvable coating which have variable drying times applied in a spot just big enough to write the number on very carefully, usually on a surface propped up at an odd angle.


That second box also had a Brownie Holiday Flash Camera. One morning I had been telling Joan, the staff member with whom I work, about the Rescued Film Project.  Seeing the blank red counter window in the camera I was holding,  I told her "Well, there's no film in this one."  A minute later when she went back to her office, I opened the camera and saw this 127 roll of Verichrome Pan.


My developing tank just happens to be a vintage Yankee adjustable tank that has a setting on the reel for 127 film (46mm wide). After an impromptu meeting with Joan and the two curators, it was agreed I should go ahead and develop it. The internet told me it was just like Plus-X, so I used Rodinal 1:50. It turned out to only have the last three frames exposed depicting a young woman in the back yard dressed up for some occasion in the early 1970s from the look of her hair and dress. Camera movement made the first two look quite pinholey. The third was sharp, but had a pattern over part of it that looks like someone had opened the camera briefly before completely rewinding the film. The staff was very familiar with the person who had contributed the camera (along with several hundred Christmas ornaments) and sent her the images. It turned out to be her sister at her confirmation.

It's not all cameras. The next box included a variety of contact printing frames, developing trays, tripods, a box of Agfa Superpan Press with 4 sheets left, and a folding Brownie Enlarging Camera complete with manual. You put the negative in the top and the paper in the bottom with a lens in the middle in the darkroom and then "expose it to daylight."


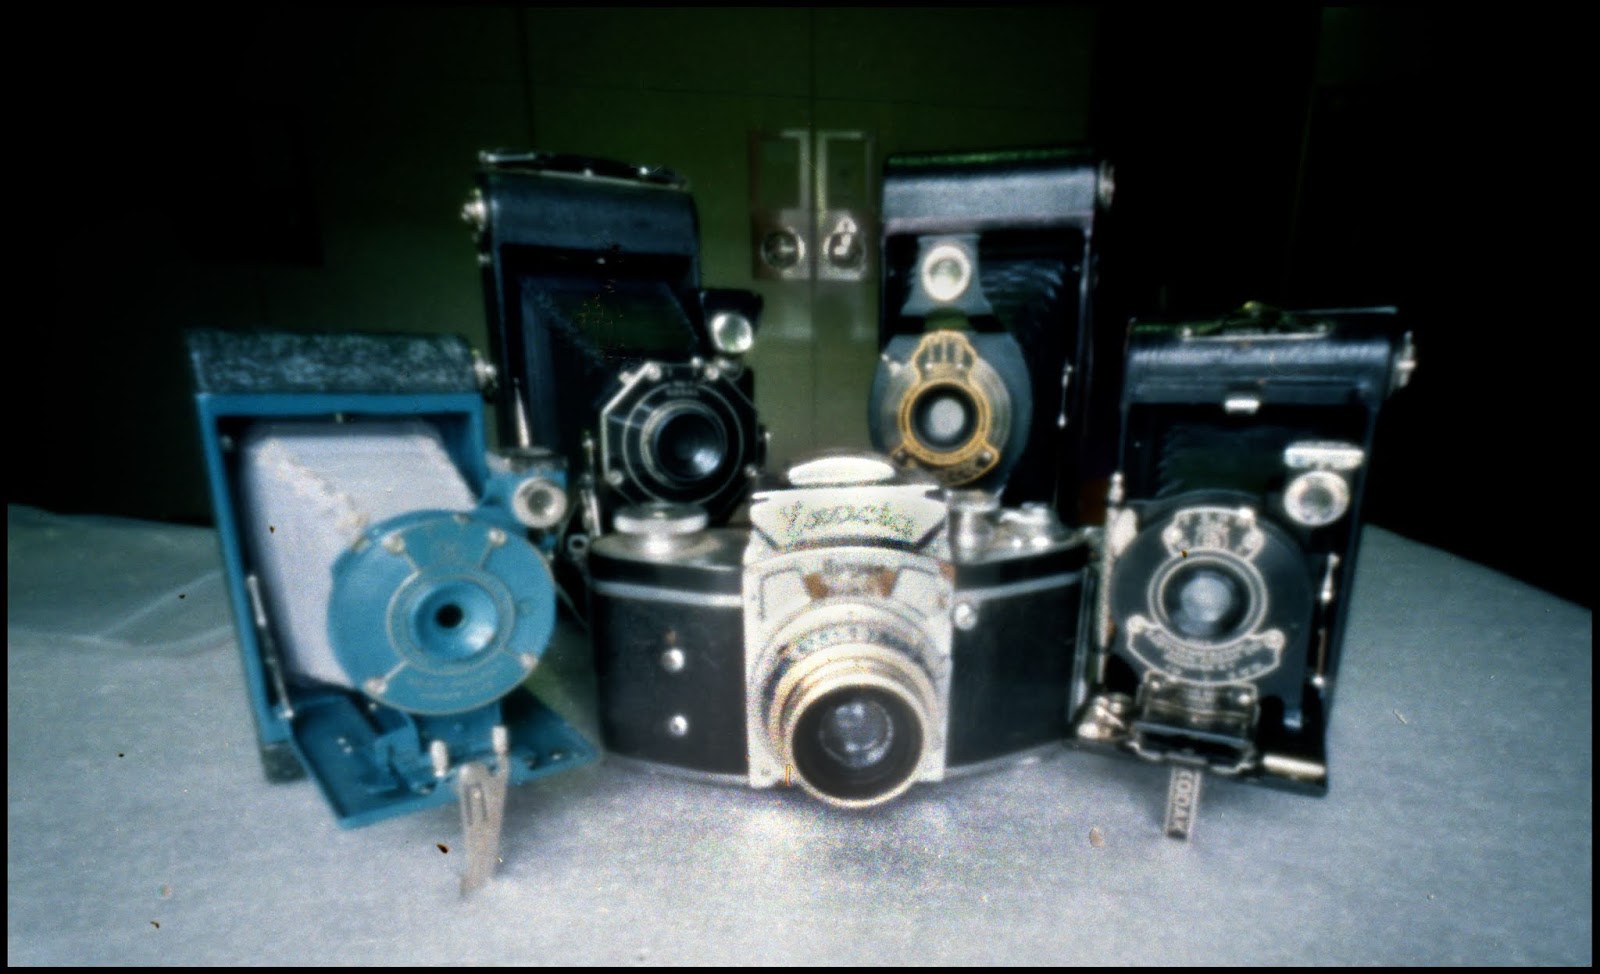
There were also five cameras in that box, all in good shape and working perfectly.  The two little folders in the front use 127 film and the two larger ones in the back use 616 and so all are unusable, but they still make film for the Exacta.


All with the Populist. .15mm pinhole 24mm from 24x36mm frame.

Wednesday, June 13, 2018

Building the evil cube template

The techniques for building the Evil Cube template are very similar to my other cameras that are covered in the 10th Anniversary Populist post.  If you were thinking of making one, it would probably be a good idea to look that over if you're not familiar with how I make cameras.

 Link to Evil Cube Template description Link to templates.  Link to 10th Anniversary Populist post

The Evil Cube template is set up on four sheets of letter size paper, and it will fit on A4. The largest part is almost 11 inches so it still takes a fairly large cereal box to make, and you'll probably need two of those. Of course the first step is to glue the template to your card stock, and when it's dry cut out the parts and all the holes. The grey areas are the glued surfaces. Remember if you're using a box with a glossy surface, sand or otherwise roughen it if it's the side that's getting glued.

The image chamber is the most complicated part to fold and glue.  It might be a little longer than your printer area, but they're pointy corners so it should be pretty easy to recreate. Remember to print at 100% and not "fit to print." It should fit pretty comfortably on A4 paper. There are three steps that need to be done in order.

The first is to glue the double layer that makes up the sides of the image chamber. Make sure to tightly crease the fold and in order to clamp it, you may have to fold the remaining end of the flap over your clamps to get the edge well clamped.  As always, it's best to get the entire surface adhered.


Next, fold it into the shape of the image chamber.  One of the trapezoidal sides is only partially grey. That's where the tripod mount will be glued and that one goes on the inside, the entire grey end is the outside.


The last part, which makes the camera front stiffer and restricts the movement of the film reel, is folded and glued.  The front of this structure should be a flat surface - you might have to adjust it a little.  The best way I found to clamp it was with a rubber band around it vertically.


The image chamber is then glued to the film holder to create the internal assembly. I forgot to take a picture with it clamped like that but the template is pretty well marked where everything goes. Make sure it’s aligned correctly with the lines on the template and the tripod mount hole.

The stop which holds the bottom of the film reel in place is made from a double layered piece of your cardboard.  Note also that the flap at the left isn't glued.  You need to open it to get the film reel in and out.  It just folds closed and is held there when the assembly is placed in the camera.


Notice there is a gap between the film reel and the top of the holder. A spacer is necessary above the takeup reel to make sure it stays down against that stop at the bottom to keep it parallel when winding the film. Make as many copies of the film holder spacer to fill that gap so the film reel just fits. It took four layers to fill the gap for this camera but that may vary depending on the accuracy of your folds and the thickness of your card.


Glue the spacers in.  Use a scrap piece of dowel to make sure these are aligned with the winder hole.


Also do this on the supply side.

Cover the rear edges of the film holder that the film rides over with some tape to make a smooth edge.

To make sure you've got a tight fit, fold the camera back around the internal assembly with the flaps on the inside. In order to prevent them from getting glued together, I always wrap some wax paper around the internal part first.


Then, this time with the flaps on the outside, again separating them with wax paper, fold and glue the front over the back (leave the internal assembly in there so you don't crush the back when you clamp it.)


The winders are my standard 3/8 inch dowels with the end sculpted to fit into the slot of a 120 reel. They're exactly the same as with the 10th Anniversary Populist  so I won't repeat it here.  With my camera I also glued some cork bottle stoppers to make it a little easier to wind, but that's not really necessary.  If you do put the knobs, make sure to leave a gap between the winder collar and the knob for the front to slide between.  This is all well illustrated in the directions for building the Variable Cuboid.


The tripod mount is also the same as the Populist other than the shape to fit the image chamber.

Of course, if you're not absolutely sure your card and template is opaque, now is the the time for a few coats of matte black paint. Also remember to cover that edge of the image chamber the film rides over with tape or cloth.

This camera is set up to have a rising front pinhole. The pinholes are taped right onto the front of the internal assembly.  The optimal diffraction is just under .3mm by the way. Careful not to cover one with the other. You can, of course, install just one pinhole, but I'd either not cut the second hole in the first place, or cover the hole with tape.


The shutter is exactly the same as with the 10th Anniversary Populist, except it's stretched to cover both pinholes, and the moving shutter itself is cut in half.  I liberally cover the surface between the two halves with pencil lead graphite so when you pull the handle for one, friction doesn't pull them both open. It's symmetrical around the horizontal axis so you could mount it for use by whichever hand you prefer. There's no reason why you couldn't make a second pinhole and use this on any of my other 120 cameras.     


It's important to make sure the film reels are down where that stop will hold them in place when you load the film, place the back over it, and insert the winders.


Film advance requires loosening the supply and then tightening the take-up.  Remember to tighten both winders so the film is flat before making an exposure if you want to avoid some unpredictable pinhole fun.

I used beaded pins for viewfinders, I've included some center pinhole finders on the template, but I can't quite think how to make a flat finder for both pinholes except by drawing lines.

Now go out and show everyone how cool you are with your classy cubical medium format camera.


Saturday, June 9, 2018

An evil cube template


Regular readers may have noticed that the camera I've used most often in the past two years has been the Evil Cube (6cm from 6x6cm frame). I've used it for Worldwide Pinhole Photography Days in 2017 and 2018, it went to Massachussets for my son's wedding, and it was one of the two medium format cameras I took to Europe last fall. I chose it when I went out into a blizzard recently.

It was made from cutting pieces of flat matte board and taping and gluing them together, sort of figuring it out as I went along. When I was loading it for Pinhole Day, I wondered if I could make a template that would fold and glue together like my other cameras so anyone could make one. I think I accomplished it. Here’s a link to directions to build this camera.

There's really no technical need to design a new camera.  The image format is exactly the same as a 6cm 120 Populist. But there's the issue of form factor.  When I made the Evil Cube, and the Glenmorangie Evil Cube and Compact 120 before it, my inspiration was an unreachably-expensive-in-my-youth medium format SLR. (Never mind that it's sort of the same form factor as a million mid-century Brownies, Hawkeyes, and Pioneers. I never had one of those either.)  I've recently seen a forum thread where the NOPO 120 was gushed over for it's similar shape, so I'm not the only one with this obsession.

As long as I was making a new camera, I thought I'd see if I could improve a couple issues.

The classic winders for a 120 Populist are 3/8" dowels with the ends shaped to fit into the slot of a 120 film reel, with an opaque collar glued around it to reduce the chance of light leaks through the winder holes, and with a WinderMinder over the collars to keep the winders from falling out, itself held on by a rubber band.  The problem is that the diameter of the dowels is a little small to give much torque when winding and your fingers can get really tired gripping that little thing.  I've been glueing them into the plastic cap end of a cork bottle stopper which works really great, but then you can't put a WinderMinder over it to make sure they stay put. I make my winders really tight and put tape over the tab to make them tighter in the slot, and that works, but it's a little bit of a kluge.  And the WinderMinder is a separate part that could blow away when you're reloading in the field.

The other thing that I wanted to play with was the rising front pinhole.  I got kind of interested in this with the Pinhole Lab Camera, and I recently found out the Reality So Subtle cameras have one. Recently, trying to minimize the impact of converging verticals with Stella at the Public Museum and the Paine Art Center made me wish I had this option. This may be considered trying to guilt you in to staying around and looking at the pictures below, but I really like the rising front pinhole.


The camera is made made from four main folded parts.  The image chamber and the film holder are first glued together to make the inside assembly.  You have to do something to keep your film reels parallel or your film is going to jam up.  In the Populists, it's a box just larger than the film.  In the original Evil Cube with it's triangular space for the film bay, I inserted some cut off nails through the bottom, but those are little parts that can get got lost. The simplest solution to me was a double layered piece of cardstock, the same thickness as the flange on the film reel, glued where the reel would be pressed when the winder was inserted into the top and held there firmly when the camera is closed. That should keep the bottom of the film reel from wandering.  It seems to have worked. (later edit: I subsequently made significant improvements to this.)


The film is loaded wrapped around the inside assembly.


This assembly is then inserted into the back, and the winders are inserted throught the holes and into the film reels.


The front then slides over the back in a gap between a collar and a cork stopper on the winders, which solved the problem of the winders falling out.


For the rising front, making a a pinhole that actually went up and down is way too complicated for me (another later edit: I figured that out too, but it takes more room), so I took the simple way out, two pinholes, one higher than the other.  It took me seven tries to get two identical pinholes at .3mm. I was a little disappointed to not get them a little smaller, but to entice you again, I don't think that's an issue with the pictures.

The rising pinhole is 15mm over the on-axis pinhole.  That was just a guess. It was far enough to make sure I could keep one covered while the other was opened. According to Mr. Pinhole, there's a 115mm image diameter at this distance, so I've got a little area to play with. It turned out to be a very useful rise, and I hardly noticed any vignetting.

For the shutters I just made one big really wide shutter, and cut the moving part in half. The over and under shutters open to the side, which ever handedness you prefer.


I really like the rising pinhole (or should that be The Risen Pinhole?)

All this is happening at f200, and moderately wide angle, 53 degrees. I think most people consider 80mm normal for this format.


So as is my wont, I went for a test on a bicycle ride around Oshkosh. This was my first experience with TMax 100 as well.

You knew I was going to start with the rising pinhole. The stone clad modernish Evangelical Lutheran Church on Church Street is connected to what I think is their older clapboard covered church behind it on Parkway.  This is the joint between the two.


Turning to the left, the almost-third-quarter moon was just barely visible to the right of the bell tower.  Despite getting some grey scale to the blue sky, I can't see a trace of it in the negative.  Anyway, how about those parallel verticals, and there's a seagull sitting on the left pylon if you zoom in to full resolution.


Next door, I couldn't get far back enough from the Morgan House to get the rising pinhole shot I wanted and kept getting the sun in one of the windows from that angle. So I thought, damn the converging verticals, I'll just point the camera up and use the on-axis pinhole. This is the only time I used it. Picked up a little flare anyway, and there's another seagull on the chimney.


The Public Safety Building is an equilateral triangle. Do you think they engraved those lines in the walls just to challenge me?  I was surrounded by police cars when I took this.


On the other side of City Hall, there's a hidden little courtyard with a table and bench between The Beach Building and a city garage, with this rather large tree kind of espaliered up the wall.


The back end of the Grand Opera House, with yet another seagull on the chimney.


I've tried to photograph this wall of the old Miles Kimball Building several times. Using a wide-angle camera pointing up making it look like it's falling over really distracted from what I want to portray.  Now with the rising pinhole, here's the left side of the wall.


Using the sidewalk to make sure I kept the camera parallel, the right side of the wall from twenty yards down.


And here's the diptych you're trying to imagine.


Sarah had an interview here once and described the interior as Dickensian. They used to hire artists to do drawings as piece work from a photograph of someone's house to put on Christmas cards. They're going to renovate it into an apartment building with a restaurant on the ground floor and a bar on the top. That should be a good place to take pinhole photographs. Here's the front of the building from the empty lot across the street.  It appears I didn't make sure my film was tight and I got a bit of a curve to the horizontals toward the top.  It's kind of funny that I was trying to be pinholey by waiting until a white car made streaks going by, but the camera upstaged me with the curvy film.  This combination of the view camera correctness of the verticals with pinhole funhouse cracks me up.  It looks like the building has a raised eyebrow.


This is the new "Sawdust" development area where an arena was built for a Milwaukee Bucks minor league team. The city is hoping it will spur all sort of hip development in what is a pretty blighted area. It used to be the factory district and there are still a few industrial buildings active in the area.

Restoration of the area is going slowly.


Just next door is this little brick building given a little bit of a Loony Tunes look by curved film again.


All with the new Evil Cube. two .3mm pinholes 6cm from 6x6cm frame on Kodak TMax 100 developed in Rodinal 1:50. Also with the Manfrotto Compact Advanced Aluminium Tripod extended out to it's full 66 inch height.