Next summer at the Trout Museum of Art, I'm going to teach four sessions of a pinhole class where the participants will build a 120 Populist and expose a roll of film. It will be processed before the next day's session by the only lab in the Fox Valley, which happens to be just across the street. I thought that having physical prints made would have more impact and let the participants get a look at them and evaluate their camera work without the distraction of a digital device. The commercial automatic print process is designed to give the masses snapshots done with Instamatics that only had a single aperture and shutter speed. It should produce a reasonable print from almost any negative.
I've never had automatic prints made directly from pinhole negatives before. To find out what they're like, I exposed a roll of Ektar 100 in Goldberry (She had been loaded up for the trip to Massachussets, but there wasn't enough room in my backpack.) The lab made 4x4 inch prints. On reflection, they're OK, but initially I was pretty disappointed.
It's made me aware of how critical editing is in photography. In the past we would have just called it print making. When I read people proudly state that their images are completely unmanipulated, I always think they just don't have enough respect for their negatives to polish them up. Maybe they have perfect negatives. Everybody deifies Ansel Adams and he was very public about how much he manipulated prints. The manipulations I do are analagous to what I used to do in the darkroom, except I could never afford to do it in color. It took mental skill, like deciding on filter packs and development, and physical skill, like burning and dodging and bringing out detail in highlights by holding your warm hand against them in the developer.
I'm not adding anything or combining images. I'm only working to bring out what I think is there in the negative. I'm really impressed by film lately in capturing the subtleties of color and light. I never do any sharpening or unsharp masking.
Doing this well in software requires a bit of skill. My first version of Photoshop was v0.87. There are some basics, like extending the tones to the full print range, that anyone can learn quickly.
The Levels Tool with it's histogram of density is like a test strip of the whole negative but with more choices. The first Photoshop workshop I took was taught by a guy I had known in college who was insistent that no one really serious uses Brightness and Contrast instead of Levels. but for me it's a useful supplement, almost always to increase contrast. Most negatives require Color Balance, but the pictures below are Ektar 100 in daylight processed by a commercial lab, so job done. I continually Burn and Dodge manipulating the brush size, range and intensity, always with the 100% softness brush setting.
The lab prints don't seem to have any dust spots. With my scans, dust is a real problem. I hate dust removal filters. They remind me of the way bipolar people describe mood stabilizers. It takes care of the worst problems but they make you feel a little blurry. (Kind of a funny statement from a pinhole photographer.) All the microscopic dust is retouched with the Clone tool in the 200% view. It's tedious but I get into kind of a shop yoga state. And besides, I really want to see the absolutely clean picture. I think of every picture as a very large print.
Later on I'll show a comparison of the automatic prints to the edited versions, but first, the test images in all their finished full-resolution glory, from my scans. In almost all of them, the initial preview scan was adjusted to make them darker. I didn't compare them to the lab prints when I was doing this,
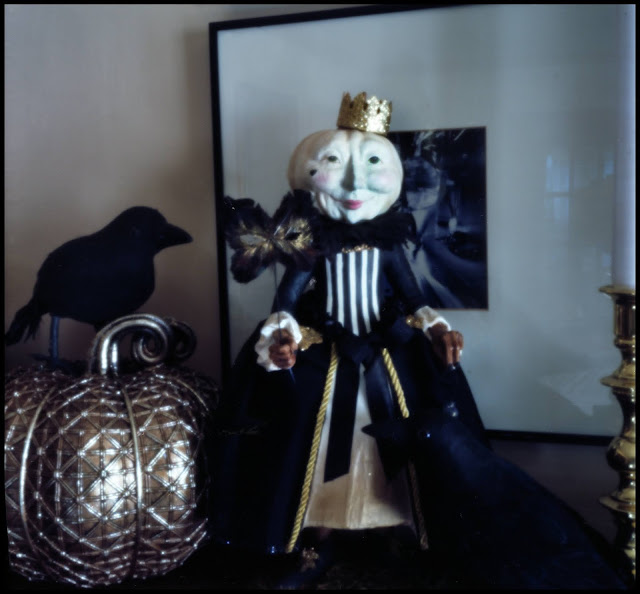
The morning light through the front windows on the pumpkin lady with her white head and black dress and the crow in the shadow would be a good test. Her face is overexposed and the shadows are competely blank.
Orange slices and cherry coins to take on my bicycle rides. I spent a lot of time trying to eliminate the cyan/green cast of the highlights off the cellophane and then realized it was a reflection of the sky and the garden,
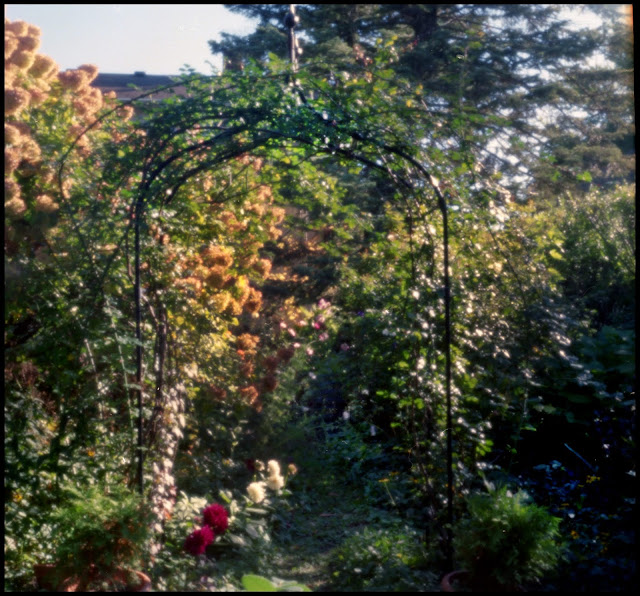
It took a lot of work dodging midtones and burning shadows to make the skinny tubes of the arbor visible.
One morning, the air was extraordinarily still. I found a bumble bee sleeping in one of the dahlias. The exposure was twenty minutes. When I came back to close the shutter, the sun had moved from behind the trees and woke the bee up but made some great highlights on the edges of the petals.
Another subtle color test with a pink zinnia in dappled light. Sarah planted a row of dahlias, zinnias and cosmos along the garden path. It's made the most delightful patterns of random dots of color.
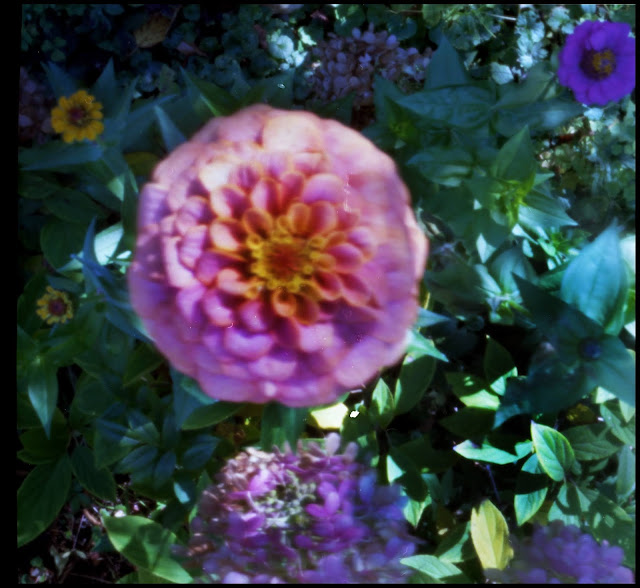
After getting that zinnia holding still at the end of a long stalk, I tried a cluster of blossoms on a rose bush and lost the bet with the wind.
I started looking under the vines for subjects that would be better supported.
We haven't had the courage to eat the ghost peppers. They were a pale spectral presence for most of the summer but they've matured into a nice set of color swatches.
A habanero fits comfortably on a 6x6cm negative so this is at least a 1:1 macro. I think it moved ever so slightly in a barely perceptible gust.
The Jack-Be-Little pumpkins were held pretty solidly among the vines.
Lungworts look just like someone spattered dilute white paint on them.
Another gamble with the wind. This was the only red lettuce plant that came up from the mesclun mix.
I got out
the black felt again for the tomatoes and Granny Smiths from the farmer's market.
So here's the comparison of the prints. Without having you over to my house to look at them, it’s impossible to make a perfect comparison. I just scanned them together and let Epson Scan pick an average. On my screen at least it looks about right.
On the left is a print from my edited file sent on-line to Camera Casino for their normal one-hour print service. On the right is the print that was made by the lab who developed the film, Murray Photo. I didn't pay to get the scans those prints were made from, but my bet is they look just like the prints..
When I did the automatic preview in Epson Scan, it looked a lot like the lab prints. On most of them I just made them darker with the Brightness scale. On a few, I used the histogram tool and did some fiddling with the black point, the middle and the highlights.
My first impressions of the lab prints is they look underexposed. Wishy-washy. The blacks aren't one hundred percent dense and brighter areas look a little blown out. Just what you might expect from my typically overexposed negatives. (My shutters are hand operated, OK?)
Another thing I notice is the lab print is masked to 6x6cm, whereas my scans are the entire width of my handmade camera's negatives. Call me stingy, but I appreciate the little bit of extra film, for example the half a candle next to the pumpkin lady and the crow's tail. It's surprising how the slightly looser cropping improved a lot of these. Just luck. I don't think I'm that accurate in my pointing.
I think I got the orange slices a little too dark.
This was the only negative I rotated and only half a degree.
I did slightly crop a few of these.
I got at least one strip of negatives in the scanner backward and forgot to flop this one. This is another where the little extra width with the black-eyed susans and the blue cosmos in the shadows make a big difference in the composition.
Sarah noticed that the shadows on the white petals are a little too blue in the print from my file and the original lab print was more accurate. If you scroll back to the original file, this print from Camera Casino looks a little bluer than the file I sent. This is one where comparing it to the lab print when I edited it would have helped.
The shadows on the middle pepper give it depth, but I could've tried to hold the higlights at its top better.
I got a little carried away with the red in this one and again lost some highlights.
A few of the prints from my files look a little too dense, but look OK in a well lit room (or gallery).
Not having that upper left leaf blown out really helps this one, and I held some detail in the shadowed leaf at the lower right.
Next to my file, this lab print looks a little flat, but it was the only one I liked originally.
I may be guilty of a little over saturation, but the tomatoes in my file look delicious.
I'm still inclined to give the workshop participants the automatic prints, but I'm going to be sure to get some kind of editing experience in there too.
Goldberry has a hand-drilled .32mm pinhole 80mm from a 6 by approximately 6cm frame. Ektar 100.


Nice articles and your information valuable and good articles thank for the sharing information AUTOMATIC BLENDING PLANTS
ReplyDelete